Ad Blocking Unleashed: Pi-hole in a Docker Container

Pi-hole is a versatile and powerful network-wide ad blocker that also functions as a recursive Domain Name System (DNS) server. It is designed to be deployed on a local network to block unwanted advertisements, tracking, and other undesirable content at the network level. Pi-hole operates as a DNS sinkhole, meaning it intercepts DNS requests and filters out requests for domains known to host advertisements and malicious content.
How It Works
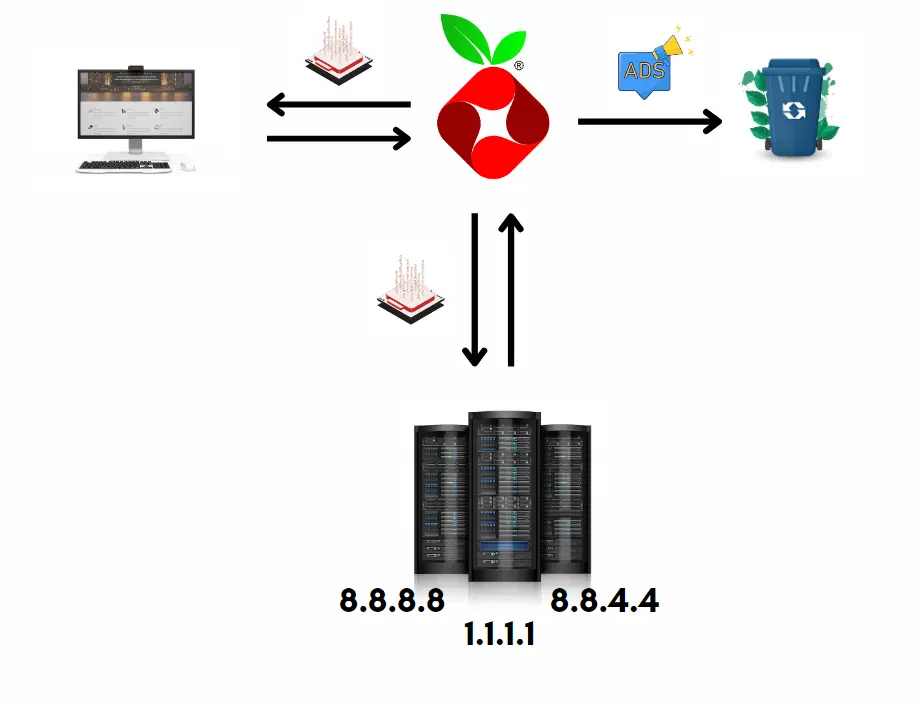
In its standard configuration, Pi-hole functions as a forwarding DNS server. This means it possesses a specific list of websites with corresponding IP addresses for resolution. If it encounters a request for a website not on its list, Pi-hole will forward the request to the next configured DNS provider.
For instance, when you input hackaday.com in your web browser, the request is forwarded to Pi-hole. As hackaday.com isn’t in Pi-hole’s list, it forwards the request to the next DNS server you’ve set up. This server then returns the IP address for hackaday.com through Pi-hole to your PC. However, during the loading process, hackaday.com may attempt to load additional websites containing ads. Pi-hole, with its adblock list, filters out these ad-related requests, enhancing your browsing experience.
Installation
Pi-hole In LXC Container
Create Ubuntu LXC:
Start by creating an Ubuntu LXC container within Proxmox. You can get it from Proxmox VE Helper-Scripts
To create a new Proxmox VE Ubuntu LXC, run the command bellow in the
Proxmox VE Shell.
1
 bash -c "$(wget -qLO - https://github.com/tteck/Proxmox/raw/main/ct/ubuntu.sh)"
Install Pi-hole and Unbound:
- Run a command in the newly created
LXC Containerto automatically install Pi-hole.
1
curl -sSL https://install.pi-hole.net | bash- Install the Unbound recursive DNS resolver. More info on Unbound DNS
- Run a command in the newly created
Add Tailscale into LXC:
By adding Tailscale into your LXC Container you can use Pi-hole as your Ad-blocker and DNS caching solution across all of your connected devices.
Run a script in the
Proxmox VE Shellto add Tailscale to the Ubuntu LXC container.
1
 bash -c "$(wget -qLO - https://github.com/tteck/Proxmox/raw/main/misc/add-tailscale-lxc.sh)"
Reboot LXC Container:
- After adding Tailscale, reboot the LXC container to apply changes.
1
 pct reboot <lxc-id>
Run Tailscale:
- Initiate Tailscale within the LXC container.
1
 tailscale up --accept-dns=false
Add Pi-hole to your Tailscale nameservers:
- Now you can add your Pi-hole to Tailscale’s global nameservers. More info on Pi-hole and Tailscale
Expand Pi-hole’s Ad-block list:
- Log in to your Pi-hole Admin UI and update
Adlistswith lists fromfirebog.net. Big Blocklist
1
2
3
4
5
6
7
8
9
10
11
12
13
14
15
16
17
18
19
20
21
22
23
24
25
26
27
28
29
30
31
32
33
34
35
36
37
38
39
40
41
42
43
44
45
46
47
 https://raw.githubusercontent.com/PolishFiltersTeam/KADhosts/master/KADhosts.txt
 https://raw.githubusercontent.com/FadeMind/hosts.extras/master/add.Spam/hosts
 https://v.firebog.net/hosts/static/w3kbl.txt
 https://raw.githubusercontent.com/matomo-org/referrer-spam-blacklist/master/spammers.txt
 https://someonewhocares.org/hosts/zero/hosts
 https://raw.githubusercontent.com/VeleSila/yhosts/master/hosts
 https://winhelp2002.mvps.org/hosts.txt
 https://v.firebog.net/hosts/neohostsbasic.txt
 https://raw.githubusercontent.com/RooneyMcNibNug/pihole-stuff/master/SNAFU.txt
 https://paulgb.github.io/BarbBlock/blacklists/hosts-file.txt
 https://adaway.org/hosts.txt
 https://v.firebog.net/hosts/AdguardDNS.txt
 https://v.firebog.net/hosts/Admiral.txt
 https://raw.githubusercontent.com/anudeepND/blacklist/master/adservers.txt
 https://v.firebog.net/hosts/Easylist.txt
 https://pgl.yoyo.org/adservers/serverlist.php?hostformat=hosts&showintro=0&mimetype=plaintext
 https://raw.githubusercontent.com/FadeMind/hosts.extras/master/UncheckyAds/hosts
 https://raw.githubusercontent.com/bigdargon/hostsVN/master/hosts
 https://raw.githubusercontent.com/jdlingyu/ad-wars/master/hosts
 https://v.firebog.net/hosts/Easyprivacy.txt
 https://v.firebog.net/hosts/Prigent-Ads.txt
 https://raw.githubusercontent.com/FadeMind/hosts.extras/master/add.2o7Net/hosts
 https://raw.githubusercontent.com/crazy-max/WindowsSpyBlocker/master/data/hosts/spy.txt
 https://hostfiles.frogeye.fr/firstparty-trackers-hosts.txt
 https://www.github.developerdan.com/hosts/lists/ads-and-tracking-extended.txt
 https://raw.githubusercontent.com/Perflyst/PiHoleBlocklist/master/android-tracking.txt
 https://raw.githubusercontent.com/Perflyst/PiHoleBlocklist/master/SmartTV.txt
 https://raw.githubusercontent.com/Perflyst/PiHoleBlocklist/master/AmazonFireTV.txt
 https://gitlab.com/quidsup/notrack-blocklists/raw/master/notrack-blocklist.txt
 https://raw.githubusercontent.com/DandelionSprout/adfilt/master/Alternate%20versions%20Anti-Malware%20List/AntiMalwareHosts.txt
 https://osint.digitalside.it/Threat-Intel/lists/latestdomains.txt
 https://v.firebog.net/hosts/Prigent-Crypto.txt
 https://raw.githubusercontent.com/FadeMind/hosts.extras/master/add.Risk/hosts
 https://bitbucket.org/ethanr/dns-blacklists/raw/8575c9f96e5b4a1308f2f12394abd86d0927a4a0/bad_lists/Mandiant_APT1_Report_Appendix_D.txt
 https://phishing.army/download/phishing_army_blocklist_extended.txt
 https://gitlab.com/quidsup/notrack-blocklists/raw/master/notrack-malware.txt
 https://v.firebog.net/hosts/RPiList-Malware.txt
 https://v.firebog.net/hosts/RPiList-Phishing.txt
 https://raw.githubusercontent.com/Spam404/lists/master/main-blacklist.txt
 https://raw.githubusercontent.com/AssoEchap/stalkerware-indicators/master/generated/hosts
 https://urlhaus.abuse.ch/downloads/hostfile/
 https://malware-filter.gitlab.io/malware-filter/phishing-filter-hosts.txt
 https://v.firebog.net/hosts/Prigent-Malware.txt
 https://zerodot1.gitlab.io/CoinBlockerLists/hosts_browser
 https://raw.githubusercontent.com/chadmayfield/my-pihole-blocklists/master/lists/pi_blocklist_porn_top1m.list
 https://v.firebog.net/hosts/Prigent-Adult.txt
 https://raw.githubusercontent.com/anudeepND/blacklist/master/facebook.txt
- Log in to your Pi-hole Admin UI and update
Whitelist false positive domains:
When you add a lot of domains to your adlist there’s probability of false positives, so it is recommended to add some commonly white listed domains. Here is the link to an awesome github repository with unattended setup White List Pi-hole.
Ensure Python is installed:
1
python3 --version- Otherwise install it by running:
1
 apt install -y python3
- Finally, whitelist domains:
1
2
 git clone https://github.com/anudeepND/whitelist.git
 python3 whitelist/scripts/whitelist.py
Pi-hole In Docker Container
We will be using Docker Compose file for setting up Pi-hole with Unbound as a DNS resolver. You can visit official Github repo with instructions.
Installing on Ubuntu or Fedora
Modern releases of Ubuntu (17.10+) and Fedora (33+) include
systemd-resolvedwhich is configured by default to implement a caching DNS stub resolver. This will prevent pi-hole from listening on port 53. The stub resolver should be disabled with:1
sudo sed -r -i.orig 's/#?DNSStubListener=yes/DNSStubListener=no/g' /etc/systemd/resolved.conf
This will not change the nameserver settings, which point to the stub resolver thus preventing DNS resolution. Change the
/etc/resolv.confsymlink to point to/run/systemd/resolve/resolv.conf, which is automatically updated to follow the system’snetplan:1
sudo sh -c 'rm /etc/resolv.conf && ln -s /run/systemd/resolve/resolv.conf /etc/resolv.conf'
After making these changes, you should restart systemd-resolved using:
1
systemctl restart systemd-resolved
Now, we can continue with running
docker-compose.ymlfile:1
docker-compose up -dDo not forget to create
pihole-data,pihole-dns,unboundvolume folders before starting containers.You can access the Pi-hole service on
http://192.168.1.11:8888/admin/.Use this command to set or reset the Web interface Password:
1
docker exec -it pihole_container_name pihole -a -p
1
2
3
4
5
6
7
8
9
10
11
12
13
14
15
16
17
18
19
20
21
22
23
24
25
26
27
28
29
30
31
32
33
34
35
36
37
38
39
40
41
42
43
44
45
46
47
48
49
50
51
52
53
54
55
56
57
58
59
60
61
62
63
64
65
66
67
68
69
version: "3.8"
services:
  unbound:
    image: mvance/unbound:latest
    container_name: unbound
    restart: unless-stopped
    hostname: unbound
    volumes:
      - unbound:/opt/unbound/etc/unbound/
    networks:
      private_network:
        ipv4_address: 10.2.0.200
    cap_add:
      - NET_ADMIN
    env_file: .env

  pihole:
    depends_on:
      - unbound
    container_name: pihole
    image: pihole/pihole:latest
    restart: unless-stopped
    hostname: pihole
    ports:
      - "53:53/tcp"
      - "53:53/udp"
      - "67:67/udp" # Only required if you are using Pi-hole as your DHCP server
      - "8888:80/tcp"
    dns:
      - 127.0.0.1
      - ${PIHOLE_DNS}
    volumes:
      - pihole-data:/etc/pihole/
      - pihole-dns:/etc/dnsmasq.d/
    cap_add:
      - NET_ADMIN
    networks:
      private_network:
        ipv4_address: 10.2.0.100
    env_file: ./.env

# Docker Networks
networks:
  private_network:
    ipam:
      driver: default
      config:
        - subnet: 10.2.0.0/24

# Docker Volumes
volumes:
  pihole-data:
    driver: local
    driver_opts:
      type: 'none'
      o: 'bind'
      device: '$VOLUME_PATH/pihole/etc-pihole'
  pihole-dns:
    driver: local
    driver_opts:
      type: 'none'
      o: 'bind'
      device: '$VOLUME_PATH/pihole/etc-dnsmasq.d'
  unbound:
    driver: local
    driver_opts:
      type: 'none'
      o: 'bind'
      device: '$VOLUME_PATH/unbound'
.Env file example:
1
2
3
4
5
6
7
8
9
10
11
12
13
14
15
16
17
18
19
20
21
22
23
24
# Volume Path
VOLUME_PATH=~/homelab-containers/

# User and group identifiers
# User ID
PUID=1000
# Group ID
PGID=1000

# Network settings
# Subnet for the private network - NOT USED IN COMPOSE FILE, CAN BE REMOVED
# SUBNET=10.2.0.0/24

# Static IP for Unbound
UNBOUND_IPV4_ADDRESS=10.2.0.200
# Static IP for Pi-hole
PIHOLE_IPV4_ADDRESS=10.2.0.100

# Pi-hole settings
# Web password for Pi-hole, set to a secure password
WEBPASSWORD=

# IP address for the Unbound server used by Pi-hole
PIHOLE_DNS=10.2.0.200
In order to Unbound work properly we need to write our own configuration, lucky for us there is an example on the pi-hole website.
Finally, configure Pi-hole to use your recursive DNS server by specifying
10.2.0.200as the Custom DNS (IPv4) and uncheck any Forwarding DNS’s: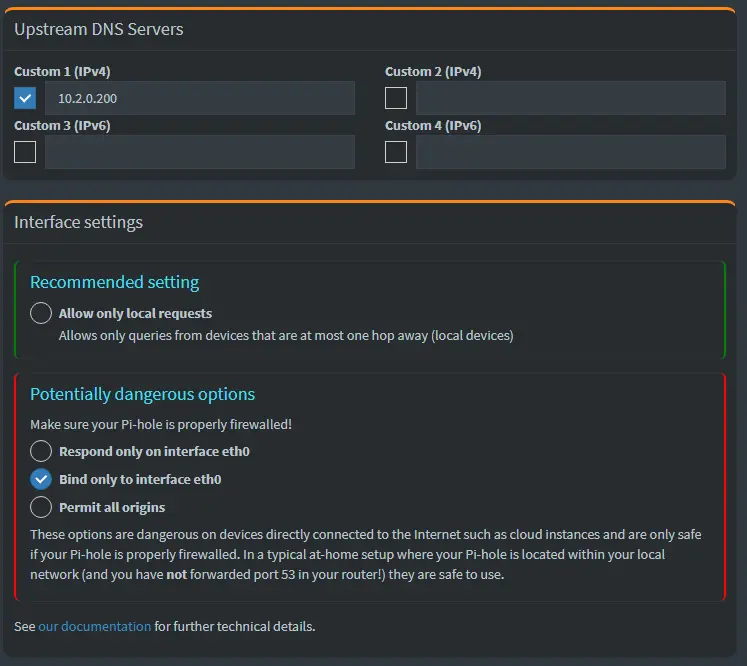
In the DNS settings in the web UI you can either set the resolver to
Allow only local requestsOR you can set it toBind only to interface eth0if you set it toBind only to interface eth0it appears to drop the warnings AND the allows a system to work.
Wildcard DNS in Pi-hole
Wildcard DNS, for those who don’t know, is a technique that enables any type of host name to share the same IP address as its DNS name. For instance, if my domain is jokerwrld.win and my IP is 1.2.3.4, the record lab.jokerwrld.win will also share the same IP: 1.2.3.4. This is particularly useful in various scenarios where you’re managing numerous containers, such as in Kubernetes, OpenShift, Rancher, etc.
The issue with Pi-Hole is that it’s possible to add a Wildcard DNS, but not through the GUI, only through the shell.
So, how do we add Wildcard DNS to Pi-Hole on our homelab? Follow these steps:
Login to your pi-hole and go to
/etc/dnsmasq.d/Create a new file, lets call it
02-my-wildcard-dns.confEdit the file, and add a line like this:
1
 address=/home.jokerwrld.win/192.168.1.20
Save the file, and exit the editor
Run the command:
1
 service pihole-FTL restart