CI/CD Mastery: Jenkins, Docker, Terraform, Ansible, and More...
Introduction
Overview
The Continuous Integration and Continuous Deployment (CI/CD) pipeline described in this documentation is designed to streamline the development, testing, and deployment processes of a web application built with Spring Boot. This comprehensive pipeline leverages Jenkins, Maven, Docker, GitHub Packages, Terraform, and Ansible to automate various stages of the software development lifecycle.
Purpose and Objectives
Efficient Development: Enable developers to work collaboratively on the Spring Boot application while ensuring code quality and consistency.
Automated Builds: Automate the build process using Maven, ensuring that the application is always built from the latest source code.
Containerization: Containerize the application using Docker and apply best practices for efficient image creation.
Version Control: Manage versioning by incrementing the application version from the
pom.xmlfile and pushing changes to GitHub Packages.Infrastructure as Code (IaC): Use Terraform to provision the necessary infrastructure, including Virtual Private Cloud (VPC), subnets, EC2 instances, and SSH keys, in a repeatable and consistent manner.
Provisioning and Deployment: Utilize Ansible for provisioning EC2 instances with Docker and development tools and for deploying Docker containers onto those instances.
By implementing this CI/CD pipeline, the project aims to enhance development agility, maintain code quality, and ensure the reliable and automated deployment of the web application.
Prerequisites
- Jenkins Server:
- Recommended OS: Stable Linux Distro [Debian, Ubuntu LTS, CentOS, Red Hat].
- Sufficient compute resources (CPU, RAM, and storage) to run Jenkins and execute build jobs.
- Internet connectivity for accessing external resources and repositories.
- Software and Tools: Docker, Git, OpenSSH.
- Recommended installation links:
- Ansible provisioning playbook: Linux Automation With Ansible
- Official Jenkins installation guide: Installing Jenkins
- Install Jenkins as Docker container: Homelab Containers
- Ansible Server:
- Recommended OS: Stable Linux Distro [Debian, Ubuntu LTS, CentOS, Red Hat].
- Adequate resources for running Ansible and managing infrastructure.
- Internet connectivity for downloading Ansible roles and modules.
- Software and Tools: Ansible, AWS CLI with appropriate AWS credentials configured, Terraform, Git, OpenSSH.
- Recommended installation links:
- Ansible provisioning playbook: Linux Automation With Ansible
- Official Ansible installation guide: Installing Ansible
- Official Terraform installation guide: Install Terraform
Pipeline Overview
The CI/CD pipeline described in this documentation follows a structured workflow that can be visualized as follows:
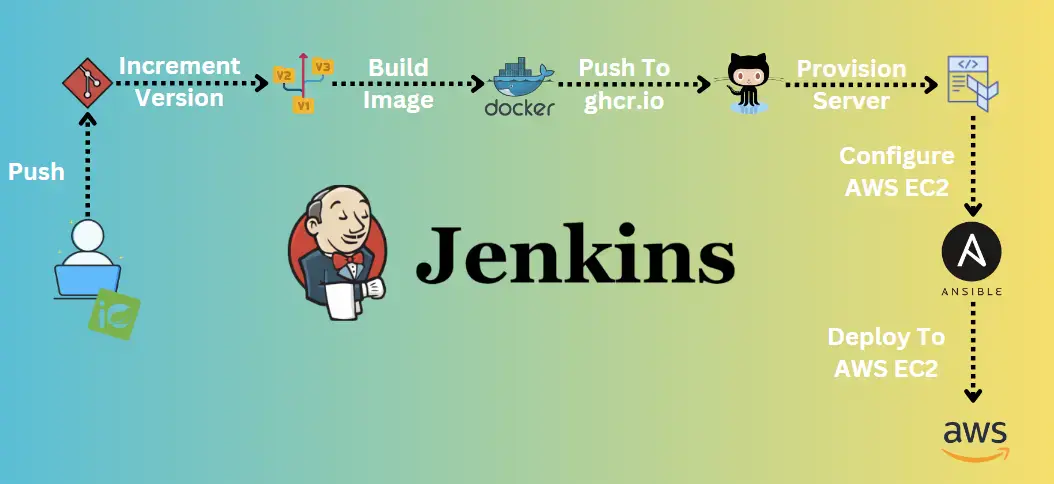
Pipeline Stages
The pipeline consists of the following key stages:
Stage 0: Developing Web Application with Spring Boot
Overview
In the first stage of the CI/CD pipeline, the team initiates the development of a web application using the Spring Boot framework. This web application will serve as the cornerstone of the entire pipeline, ultimately being containerized and deployed. The following key steps outline this stage:
Spring Boot Project Initialization
Spring Initializer:
- The team begins by creating a new Spring Boot project using the Spring Initializer tool, a resource that enables developers to quickly bootstrap Spring Boot projects with pre-configured dependencies and settings.
Configuring
pom.xml:Crucial project identification and management details, such as group ID, artifact ID, version, name, and description, are specified after the Spring Initializer setup.
1
2
3
4
5
   	<groupId>com.webserver</groupId>
  	<artifactId>java-maven-app</artifactId>
  	<version>4.0.6</version>
  	<name>java-maven-app</name>
  	<description>Static Website Hosting</description>
The Spring Boot Maven Plugin is an essential component when developing Spring Boot applications. It simplifies the build and packaging process, making it easy to create executable JAR (Java Archive) files or WAR (Web Application Archive) files for deployment.
The Maven Compiler Plugin is a vital component of the Apache Maven build tool. It allows developers to specify and customize the Java compiler settings for a project. This plugin ensures that the source code is compiled correctly, adhering to the desired Java version and other configuration options.
1
2
3
4
5
6
7
8
9
10
11
12
13
14
15
16
17
18
19
20
21
22
23
  <build>
        <plugins>
            <plugin>
                <groupId>org.springframework.boot</groupId>
                <artifactId>spring-boot-maven-plugin</artifactId>
                <version>3.1.3</version>
                <executions>
                    <execution>
                        <goals>
                            <goal>repackage</goal>
                        </goals>
                    </execution>
                </executions>
            </plugin>

  				 <!-- to handle any Java version mismatch, add the following configuration for maven-compiler-plugin -->
            <plugin>
                <groupId>org.apache.maven.plugins</groupId>
                <artifactId>maven-compiler-plugin</artifactId>
                <version>3.11.0</version>
            </plugin>
        </plugins>
    </build>
Spring local development
Local Testing:
To locally run the Spring Boot application during development, you use the Spring Boot Maven Plugin to start the application. It’s particularly useful for quick testing and debugging during development.
1
  mvn spring-boot:run
Building:
To create an executable JAR or WAR file for the Spring Boot application run the clean build by removing any previous build artifacts.
1
  mvn clean package
Running the Packaged Application: Note that
java-maven-app-*.jarshould be replaced with the actual name of the generated JAR file, which may include the version number.After successfully building the Spring Boot application, it can be run as a standalone Java application using the JAR file created in the previous step.
1
  java -jar target/java-maven-app-*.jar
Stage 1: Building Docker Image
Approach 1: Quick Containerization (Raw Image)
Dockerfile for Building a Quick Container:
1
2
3
4
5
6
7
8
9
10
11
12
13
14
15
#
# Build stage
#
FROM maven:3.6.0-jdk-11-slim AS build
COPY src /home/app/src
COPY pom.xml /home/app
RUN mvn -f /home/app/pom.xml clean package

#
# Package stage
#
FROM openjdk:11-jre-slim
COPY --from=build /home/app/target/java-maven-app-*.jar /usr/local/lib/
EXPOSE 8081
CMD java -jar /usr/local/lib/java-maven-app-*.jar
Description:
This approach involves using pre-packaged images with the necessary tools, including Maven and JDK.
The first stage is
buildthat copies the application source code andpom.xmlfile and then runs the Maven build process to create the JAR file.In the second stage, the JAR file from the
buildstage is copied, and the container is configured to expose port 8081 for the Spring Boot application.

Benefits of Approach 1:
Simplified Setup:
- The Dockerfile for a raw image often relies on base images with pre-installed tools and dependencies. This simplifies the setup process as you don’t need to configure a minimalistic image or manually install dependencies.
Rapid Development:
- This approach is well-suited for local development and testing. Developers can easily build and run their applications in containers without the need for complex image optimization.
Immediate Feedback:
- Quick containerization enables developers to receive immediate feedback on how their application behaves in a container environment. This aids in identifying issues early in the development cycle.
Iterative Development:
- Raw images facilitate iterative development. Developers can swiftly rebuild and test containers as they make changes to their code, accelerating the development process.
Proof of Concept (POC):
- It’s practical for creating proof-of-concept containers. You can demonstrate the feasibility of containerization before investing time in more complex image optimization.
Efficient for Short-Term Use:
- If containers are short-lived and used for specific tasks or temporary services, this approach can be efficient. Image size and efficiency may not be critical for such use cases.
Approach 2: Optimized Containerization (Lightweight Image)
Dockerfile for Building an Optimized Container:
1
2
3
4
5
6
7
8
9
10
11
12
13
14
15
16
17
18
19
20
21
22
23
24
25
26
27
28
29
#
# Building stage
#
FROM maven:3.8.5-openjdk-17-slim AS builder
WORKDIR /app
COPY src ./src
COPY pom.xml ./
RUN mvn -f pom.xml clean package
#
# Base image creation stage
#
FROM alpine:latest AS base
RUN  apk update \
    && apk upgrade \
    && apk add ca-certificates \
    && update-ca-certificates \
    && echo http://dl-cdn.alpinelinux.org/alpine/v3.6/main >> /etc/apk/repositories \
    && echo http://dl-cdn.alpinelinux.org/alpine/v3.6/community >> /etc/apk/repositories\
    && apk add --update coreutils && rm -rf /var/cache/apk/*   \
    && apk add --update openjdk17-jre-headless \
    && apk add --no-cache nss \
    && rm -rf /var/cache/apk/*
#
# Packaging stage
#
FROM base
WORKDIR /app
COPY --from=builder /app/target/java-maven-app-*.jar ./
CMD java -jar ./java-maven-app-*.jar
Description:
In this approach, a more optimized container is created by using lightweight base images such as Alpine Linux.
The first
builderstage compiles the application source code using Maven and Java 17, creating the JAR file.The second
basestage sets up the base image with Alpine Linux, installs necessary certificates, and ensures minimal dependencies.The final stage copies the JAR file from the
builderstage and runs the Spring Boot application using Java.

Benefits of Approach 2:
Lightweight Image:
- The optimized approach results in a much smaller Docker image (approximately 223 MB), reducing the container’s size and resource consumption compared to the raw image (448 MB).
Security and Efficiency:
- Alpine Linux is known for its minimalistic and secure nature, making it an efficient choice for containers.
Improved Resource Utilization:
- Smaller images consume fewer resources, making them more efficient for container orchestration and deployment.
Providing both approaches, allows flexibility in choosing the containerization method based on the specific requirements, whether it’s quick testing during development or optimizing for production deployment.
Semantic Versioning (SemVer)
Versioning Scheme:
- Adopt a versioning scheme for a project, such as Semantic Versioning (SemVer). SemVer prescribes a structured version number in the
MAJOR.MINOR.PATCHformat, where each component has specific rules for incrementing based on code changes.
- Adopt a versioning scheme for a project, such as Semantic Versioning (SemVer). SemVer prescribes a structured version number in the
Automation Script:
- Implement automation to update the version number in the project’s
pom.xmlfile. The provided Bash script extracts the current version, splits it into major, minor, and patch components, increments the patch version, creates a new version, and updates thepom.xmlfile accordingly.
1
2
3
4
5
6
7
8
9
10
11
12
13
14
15
16
17
 #!/bin/bash

 current_version=$(grep -oPm1 "(?<=<version>)[^<]+" pom.xml)

 # Split the version into major, minor, and patch components
 major=$(echo "$current_version" | awk -F. '{print $1}')
 minor=$(echo "$current_version" | awk -F. '{print $2}')
 patch=$(echo "$current_version" | awk -F. '{print $3}')

 # Increment the patch version
 patch=$((patch + 1))

 # Create the new version
 new_version="$major.$minor.$patch"

 # Update the pom.xml file with the new version
 sed -i "s/<version>$current_version<\/version>/<version>$new_version<\/version>/" pom.xml
- Implement automation to update the version number in the project’s
Docker Image Build:
- With the updated version in place, initiate the build of the Docker image. Ensure that the Dockerfile is configured to use the correct version tag, matching the updated version in the
pom.xmlfile.
- With the updated version in place, initiate the build of the Docker image. Ensure that the Dockerfile is configured to use the correct version tag, matching the updated version in the
Image Push to Registry:
- After a successful build, push the Docker image to a container registry, such as GitHub Packages Registry. This makes the image accessible for deployment and distribution to various environments.
Commit and Tag:
- Automate the commit and tagging process in the version control system (e.g., GitHub) after updating the
pom.xmlfile. This ensures that version changes are properly tracked and labeled in the repository.
- Automate the commit and tagging process in the version control system (e.g., GitHub) after updating the
Benefits of Docker:
Consistent Development and Testing Environments:
- Docker ensures that applications run consistently across development, testing, and production environments, eliminating the “it works on my machine” problem.
Application Isolation:
- Docker containers isolate applications and dependencies, minimizing conflicts and simplifying application deployment and updates.
Quick Development Iterations:
- Docker’s rapid container startup and teardown make it easier for project developers to iterate quickly and test changes in a controlled environment.
Version Control for Images:
- Docker images in the project can be versioned, allowing the team to track changes, roll back to previous versions, and maintain a history of the application releases.
Docker Best Practices:
- https://docs.docker.com/develop/dev-best-practices/
- https://docs.docker.com/develop/develop-images/dockerfile_best-practices/
- https://docs.docker.com/develop/security-best-practices/
Stage 2: Deploying Infrastructure with Terraform
In this stage of the CI/CD pipeline, the objective is to provision the necessary infrastructure components in the AWS (Amazon Web Services) environment using Terraform.
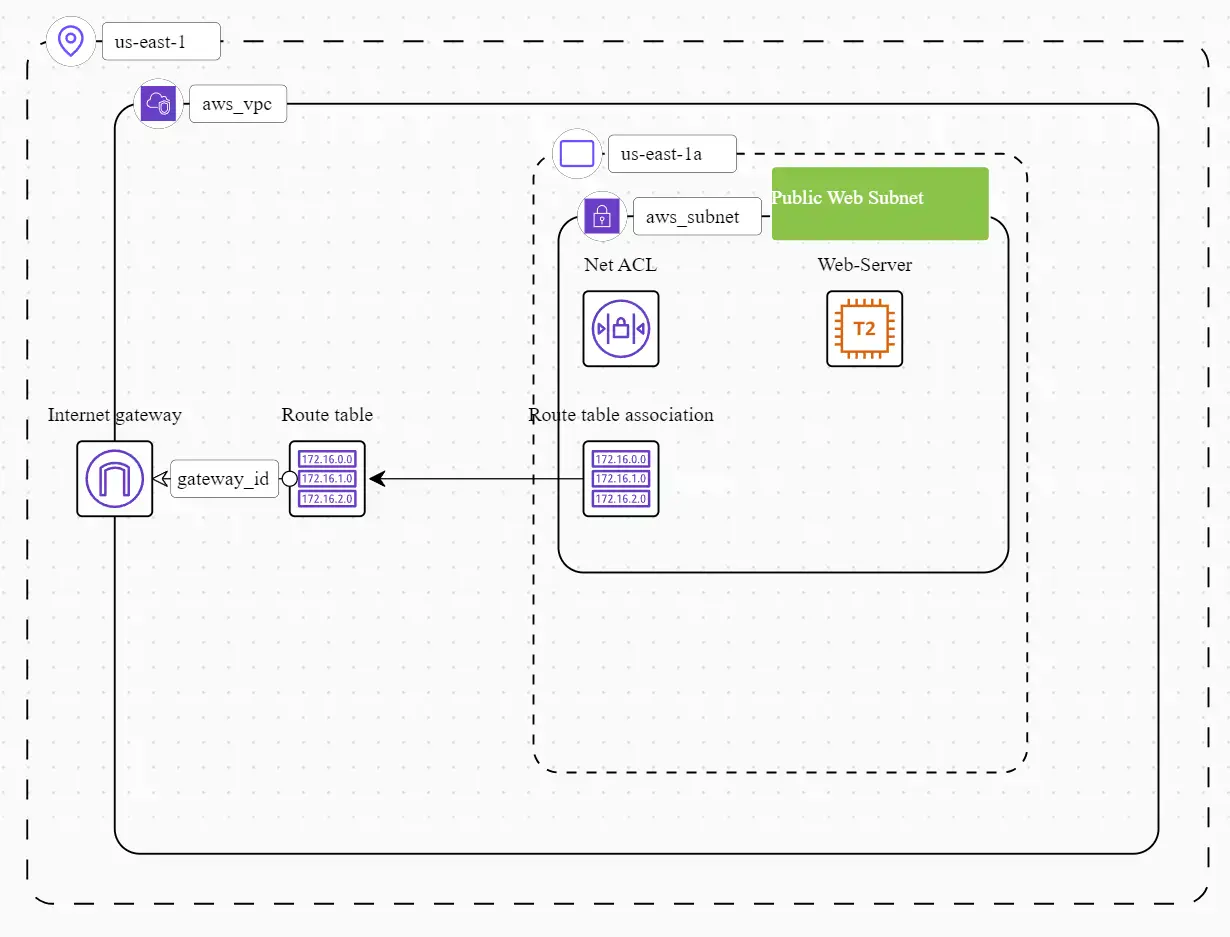
Provisioned Infrastructure Description:
Virtual Private Cloud (VPC)
- A Virtual Private Cloud (VPC) has been successfully provisioned in the US East (N. Virginia) region of AWS. The VPC serves as an isolated network environment for hosting resources.
Public Web Subnet
- Within the VPC, a public web subnet has been established. This subnet is designed to host web server instances, making it accessible from the public internet.
Internet Gateway (IGW)
- An Internet Gateway (IGW) has been attached to the VPC, enabling secure communication between the resources within the VPC and the broader internet.
Route Table for Web Traffic
- A custom route table has been created specifically for web traffic. This route table is configured to direct internet-bound traffic through the Internet Gateway, allowing resources to access external services.
Web Subnet Association
- The public web subnet has been successfully associated with the route table. This association ensures that instances within the web subnet can correctly route traffic to the Internet Gateway for external connectivity.
Web Server Module
- A Terraform module has been utilized to provision a web server instance within the public web subnet. This EC2 instance is configured with the
t2.microinstance type, making it suitable for hosting web applications.
Security Group
- A security group has been established to govern inbound network traffic to the web server instance. The security group’s rules permit incoming connections on ports 22 (SSH) for administrative purposes and port 80 (HTTP) for web access.
TLS Private SSH Key File
- A TLS private SSH key file has been generated or provided. This key file is crucial for securely accessing the web server instance via SSH, ensuring that administrative tasks can be performed securely.
AWS Best Practices:
- https://docs.aws.amazon.com/IAM/latest/UserGuide/best-practices.html
- https://docs.aws.amazon.com/vpc/latest/userguide/vpc-security-best-practices.html
- https://docs.aws.amazon.com/AWSEC2/latest/UserGuide/ec2-best-practices.html
Execution and Validation with Terraform
Project Link: https://github.com/jokerwrld999/terraform-ec2.git
Initialize Terraform:
Before provisioning the infrastructure, you need to initialize the Terraform configuration. Run the following command in the project directory:
1
  terraform init
This command initializes the Terraform working directory, downloads any required provider plugins, and sets up the necessary state and lock files.
Validate Configuration:
Validate the Terraform configuration files to ensure they are syntactically correct and don’t contain errors. Run:
1
  terraform validate
This step checks for errors in the configuration files without making any changes to the infrastructure.
Plan Infrastructure Changes:
The plan provides a preview of the changes that will be made to the infrastructure. Run:
1
  terraform plan
Review the plan to confirm that it accurately represents the changes you intend to make. It shows additions, modifications, or deletions of resources.
Apply Infrastructure Changes:
Once you are satisfied with the execution plan, apply it to provision the infrastructure:
1
  terraform apply
Terraform will interactively confirm that you want to apply the changes. Terraform will then create or modify the specified resources.
Validation After Apply:
After applying the changes, it’s essential to validate the infrastructure’s state. You can perform manual or automated tests to ensure that resources are provisioned and functioning correctly.
1
  terraform show
Benefits of Terraform:
Infrastructure Consistency:
- Terraform ensures that infrastructure is consistently defined and provisioned across all environments, reducing configuration drift and compatibility issues.
Infrastructure as Code (IaC):
- IaC with Terraform allows version-control infrastructure configurations, making it easier to track changes, collaborate, and roll back if necessary.
Scalable Environments:
- Terraform enables projects to easily scale up or down in response to changing requirements, such as additional testing environments or increased production capacity.
Resource Reusability:
- Terraform modules in the project can encapsulate and reuse infrastructure components, saving time and effort when configuring similar resources across different stages or environments.
Terraform Best Practices:
Stage 3: Provisioning EC2 Instance with Ansible
In this stage of the CI/CD pipeline, Ansible is utilized to configure and provision software on pre-existing EC2 instances. These instances were provisioned by Terraform during an earlier stage of infrastructure setup. Ansible dynamically identifies and targets these instances through a dynamic inventory.
Implementation
Project Link: https://github.com/jokerwrld999/ansible-ec2
Dynamic Inventory:
- Ansible leverages dynamic inventory to identify and categorize the pre-existing EC2 instances. This dynamic approach keeps the inventory up-to-date with the current state of the infrastructure.
SSH Key Authentication:
- SSH key pairs (
.pemfiles) have been previously generated by Terraform during the initial infrastructure provisioning. Ansible utilizes these key pairs for secure authentication and access to the EC2 instances.
- SSH key pairs (
Ansible Roles:
- Jenkins automation tool triggers Ansible Roles containing predefined playbooks for configuring the EC2 instances. These playbooks specify software installation, system configurations, and additional actions required for proper instance preparation.
Validation:
- Post-execution a Telegram message is sent, containing information about the provisioning process, including the server involved and the service’s access URL. This immediate notification ensures that you are promptly informed of the provisioning outcome and can access the newly provisioned resources without delay.

Benefits of Ansible:
- Dynamic Inventory:
- Ansible’s dynamic inventory keeps track of infrastructure changes, ensuring accurate targeting of EC2 instances.
- Idempotent:
- Ansible helps maintain consistent configurations across all servers, ensuring that each environment is set up correctly for application deployment.
- Customized Deployment Pipelines:
- Ansible playbooks can be tailored to the project’s specific deployment requirements, making it easy to integrate with the CI/CD pipeline.
Stage 4: Deploying Docker Container with Ansible
In this stage of the CI/CD pipeline, Ansible is used to automate the deployment of Docker containers to the target environment. Specifically, were created an Ansible role to handle the deployment process.
Deployment Process
The deployment process involves the following key steps:
- Docker Login:
- Ansible executes a task to log in to the Docker registry.
- Deploying the Docker Container:
- After successfully logging in to the Docker registry, Ansible proceeds to deploy the Docker container.
Playbook Details
Here is the Ansible playbook snippet that encapsulates the Docker container deployment process:
1
2
3
4
5
6
7
8
9
10
11
12
13
---
- name: Docker login
  community.docker.docker_login:
    registry_url: ""
    username: ""
    password: ""

- name: Deploying  Container
  community.docker.docker_container:
    name: ""
    image: ""
    published_ports: ""
    state: started
- In the
Docker logintask, Ansible uses thecommunity.docker.docker_loginmodule to log in to the Docker registry. The registry URL, Docker username, and password are passed as variables. - In the
Deploying Containertask, Ansible utilizes thecommunity.docker.docker_containermodule to deploy the Docker container. Key parameters include the container name, Docker image, and published ports. The container is set to the “started” state, ensuring that it is up and running.
Benefits of Ansible in Deployment:
Automation:
- Ansible automates the deployment process, reducing manual steps and potential human errors. The playbook allows for the customization of deployment parameters, making it adaptable to different containerized applications.
Idempotent:
- Ansible ensures that the deployment remains idempotent, preventing unintended changes to the container state.
Integration:
- Ansible seamlessly integrates container deployment into the CI/CD pipeline, ensuring a consistent and automated workflow.
Ansible Best Practices:
- Ansible Best Practices
- https://docs.ansible.com/ansible/latest/tips_tricks/ansible_tips_tricks.html
- https://www.ansible.com/blog/ansible-best-practices-essentials
Jenkins Configuration
Jenkins Container Deployment
Jenkins is deployed as a Docker container, providing a flexible and scalable environment for managing automation tasks. The Jenkins Docker container is equipped with the following essential components and plugins:
Docker: Jenkins includes Docker support, allowing to build and manage Docker containers as part of the CI/CD workflows.
BlueOcean Plugin: The BlueOcean plugin enhances Jenkins with a modern and user-friendly interface for pipeline visualization and management.
Git and GitHub Plugin: Git integration enables Jenkins to interact with Git repositories, while the GitHub plugin simplifies integration with GitHub repositories.
Credentials Plugin: The Credentials plugin is used for securely managing various credentials required by Jenkins jobs, such as SSH keys and passwords.
SSH Credentials Plugin: This plugin extends Jenkins’ ability to manage SSH credentials for secure communication with remote servers.
SSH Agent Plugin: The SSH Agent plugin facilitates secure SSH credentials handling and forwarding, which is crucial for secure server access.
AnsiColor: AnsiColor adds support for displaying colored console output, improving the readability of Jenkins build logs.
Project Configuration
GitHub Project:
- Jenkins configuration includes a GitHub project link pointing to Spring Boot App. This link establishes the connection between the Jenkins pipeline and the source code repository.
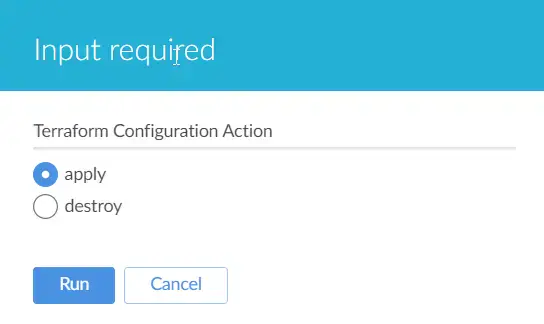
Parameterization:
- The project is parameterized, allowing for dynamic configuration and decision-making during pipeline execution. It includes Terraform Configuration Action, which specifies provisioning or destroying infrastructure.
Credentials Management:
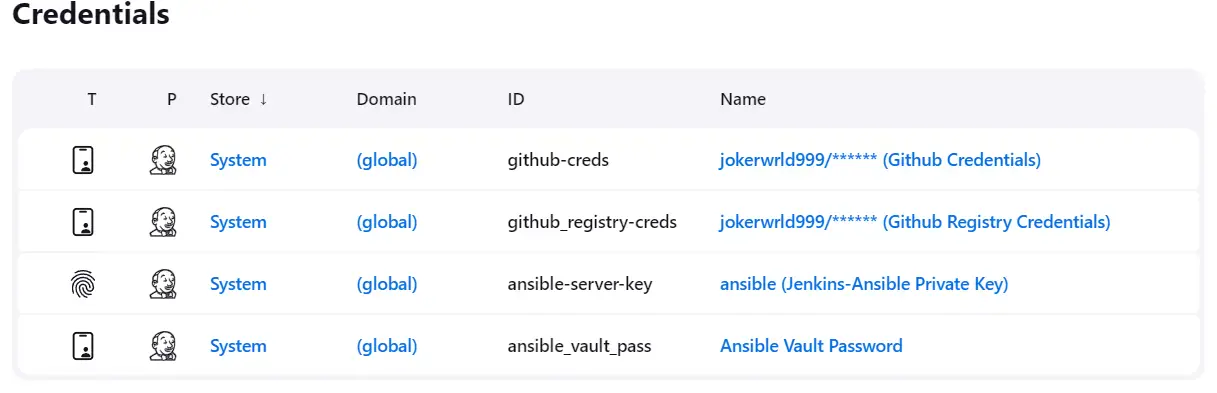
For secure interaction with various services and tools, Jenkins is configured with the following credentials:
GitHub Credentials: These credentials allow Jenkins to access and interact with GitHub repositories securely.
GitHub Registry Credentials: Used for authenticating with GitHub Container Registry when pulling or pushing Docker images.
Jenkins-Ansible private key: This SSH key is used by the SSH Agent plugin to establish secure connections for Ansible operations.
Ansible Vault password: Required for decrypting sensitive data, such as Telegram credentials, enabling the sending of notifications.
Jenkins Shared Library
Project Link: https://github.com/jokerwrld999/jenkins-shared-library
In the Jenkins shared library, critical CI/CD operations were encapsulated, promoting code reusability and maintainability. This section highlights the key functionalities implemented:
Version Incrementing:
A Bash script was employed to increment the application version.
The
pom.xmlfile was then updated with the new version, adhering to Semantic Versioning (SemVer) principles.
Docker Login:
Docker login was integrated into the shared library to authenticate with the GitHub registry.
This operation ensured that the pipeline had the necessary credentials to interact with the Docker registry.
Docker Build and Push:
Docker containerization and image building were accomplished through multi-stage Dockerfile configurations.
Images were tagged with the appropriate version for tracking and version control purposes.
By encapsulating these critical operations within the Jenkins shared library, the CI/CD pipeline achieved greater efficiency, maintainability, and consistency.
Pipeline Execution
Pipeline Provisioning
The CI/CD pipeline is triggered manually by clicking the “Build” button. This manual initiation provides control over when the pipeline should be executed, allowing to ensure that changes are deployed only when desired. The average execution time of the pipeline is approximately 13 minutes from start to finish. This duration encompasses various stages of the pipeline.
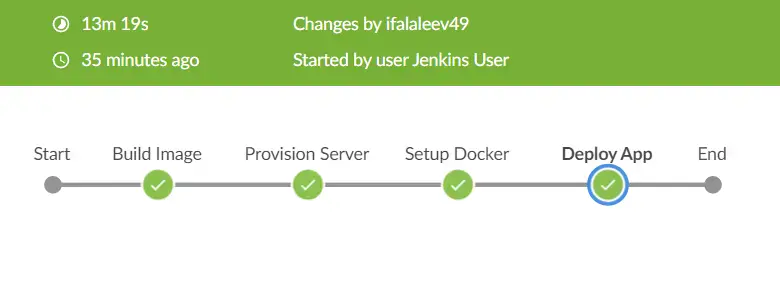
The ultimate outcome of the CI/CD pipeline is the successful deployment of the Spring Boot application artifact and made accessible on the target servers. The static website is also deployed and hosted, ensuring that it can be accessed by users. This provides a web presence for the project or application.
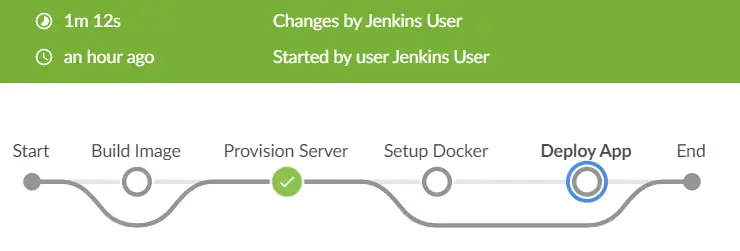
Pipeline Cleanup
Implemented a mechanism to destroy the entire infrastructure using the “destroy” option triggered by the “Build” button as part of the CI/CD pipeline, which provides a reliable and efficient way to clean up resources when they are no longer required, reducing the risk of leaving unused resources running, which can lead to unnecessary costs, enhancing the overall management of the infrastructure. This process typically takes about a minute to complete.
Jenkins Best Practices:
Troubleshooting and Debugging
Issue: Special characters like
[1;32mand[0mappearing in Jenkins logs can be due to ANSI escape codes used for colorizing the output. These codes are not properly interpreted by Jenkins.Solution: To install the AnsiColor plugin and enable it in the job configuration.
1
2
3
4
5
6
7
  pipeline {
  	agent any
  	options {
  		ansiColor('xterm')
  	}
  	...
  }
Issue: A Docker invalid reference format error typically occurs when there is a problem with the format of the Docker image reference in the Jenkins pipeline.
- Solution: Ensure that the Docker image reference in the Jenkinsfile or pipeline script is in the correct format. It should be in the form
registry/repository:tag. Verify that the tag exists and has the necessary permissions to access the image registry.
- Solution: Ensure that the Docker image reference in the Jenkinsfile or pipeline script is in the correct format. It should be in the form
Issue: Automated build triggers in Jenkins based on certain events or conditions.
Solution: Automate build triggers in Jenkins using various plugins and features such as:
Poll SCM: Configure a Jenkins job to poll the source code repository for changes at regular intervals.
Webhooks: Use webhooks in a source code repository to trigger Jenkins builds automatically when code is pushed or pull requests are created.
GitHub/GitLab Integration: Jenkins can integrate with GitHub and GitLab, allowing to trigger builds when specific events occur, such as pull requests or tag creation.
Issue: Automated build triggers without a public IP address. It’s challenging to automate build triggers in Jenkins when Jenkins is self-hosted without a public IP address. This limitation restricts the ability to receive webhooks or other external triggers for automated builds.
Solutions:
- Deploy Jenkins Server on the Cloud
- Deploying Jenkins on a cloud-based server with a public IP address resolves the accessibility issue. Cloud platforms such as AWS, Azure, or Google Cloud provide infrastructure options for hosting Jenkins. Public IP helps easily set up webhooks, integrate with external services, and trigger builds based on various events.
- Self-Host Version Control System in the same LAN
- Consider self-hosting a version control system (e.g., Git, GitLab, or Bitbucket) within the network. This allows for easier integration and communication with a Jenkins instance, even without a public IP.
- Use Webhook Relay
- Webhook relay serves as a bridge between external services and a self-hosted Jenkins instance, even if it’s behind a firewall or lacks a public IP address. Configure webhooks to be forwarded to the Jenkins server within the local network enabling automated build triggers.
- Deploy Jenkins Server on the Cloud
Conclusion
In conclusion, the CI/CD pipeline project has effectively addressed its primary purpose and objectives, resulting in a streamlined development and deployment process for the Spring Boot application. The following key takeaways, benefits, and lessons have been derived from this endeavor:
Key Takeaways & Benefits:
CI/CD Automation: The project successfully implemented a CI/CD pipeline, enabling the automation of deployment processes and infrastructure provisioning.
Infrastructure as Code (IaC): IaC principles have been embraced through the use of Terraform, facilitating version control and consistent deployments.
Docker Containerization: Docker containerization was incorporated into the pipeline, ensuring consistent application packaging and deployment across different environments.
Efficiency: The CI/CD pipeline significantly improved the efficiency of the software development and deployment process by automating manual tasks and reducing errors.
Cost Savings: The ability to destroy infrastructure when not in use contributed to cost optimization, ensuring resources were allocated wisely.
Reliability: Automation instilled reliability by consistently delivering and provisioning resources, mitigating the risk of human error.
Control: Maintaining control over resource provisioning and destruction aligned the pipeline with project requirements.
Skill Development: The project provided opportunities to develop proficiency in environment variable management, templating, and adhering to the “Don’t Repeat Yourself” (DRY) principle.
Lessons Learned:
Environment and Global Variables Management: Effective management of environment variables is critical for configuring and securing the pipeline.
Templating: Templating promotes code reuse and simplifies parameterization, enhancing the pipeline’s versatility.
DRY Principle: Abiding by the DRY principle in pipeline code enhances maintainability and reduces redundancy.
In conclusion, this CI/CD pipeline project gains valuable skills and insights into DevOps practices. It empowers efficient application delivery and management while upholding control, reliability, and cost-effectiveness in project efforts.
References
Jenkins: https://www.jenkins.io/doc/.
Spring Boot: https://docs.spring.io/spring-boot/docs/current/reference/html/.
Terraform: https://www.terraform.io/docs/index.html.
Docker: https://docs.docker.com/.
Ansible: https://docs.ansible.com/ansible/latest/index.html.
GitHub: https://docs.github.com/.
Semantic Versioning (SemVer): https://semver.org/.