Personal Docs Website /W Jekyll

Introduction to Jekyll
Jekyll is a popular static site generator that simplifies the process of building and maintaining websites. It’s designed for creating simple, fast, and secure websites or blogs with minimal setup and maintenance.
Key Features
Static Site Generation: Jekyll is a static site generator, meaning it generates plain HTML files during the build process. This results in a fast, lightweight, and easy-to-host website.
Markdown Support: Jekyll allows content creation using Markdown, a simple plain-text formatting syntax. Markdown files are transformed into HTML during the build process.
Liquid Templating Engine: Jekyll uses the Liquid templating engine, enabling dynamic content and layouts without relying on a server or a database. It provides a flexible way to manage and display data.
Customization and Theming: Developers can create custom themes or use pre-built themes to style their websites. Jekyll supports CSS, HTML, and JavaScript, allowing complete customization.
GitHub Pages Integration: Jekyll is well-integrated with GitHub Pages, making it easy to deploy and host your website directly from a GitHub repository.
Content Organization: Content in Jekyll is organized into collections, which can be easily categorized, tagged, and structured according to your needs.
Plugin System: Jekyll offers a plugin system to extend functionality. Users can create and utilize plugins to add features or automate tasks.
SEO-Friendly: Jekyll websites tend to be highly optimized for search engines, providing clean HTML and excellent performance.
Use Cases
Personal Blogs: Jekyll is commonly used for creating personal blogs due to its ease of use and quick setup.
Documentation Websites: Jekyll is suitable for creating documentation sites, making it easy to organize and present information effectively.
Project Websites: It’s ideal for creating project websites or landing pages, providing a professional and straightforward way to showcase projects.
Jekyll is a valuable tool for anyone looking to build a static website or blog efficiently and focus on content creation rather than complex configurations.
Installation
Install Dependencies
1
2
sudo apt update
sudo apt install -y ruby-full build-essential zlib1g-dev git
1
2
sudo pacman -Syu
sudo pacman -S ruby ruby-rdoc gcc make --noconfirm
To avoid installing RubyGems packages as the root user update your shell profile:
1
2
3
4
5
6
7
tee -a ~/.bashrc > /dev/null <<EOF

# Install Ruby Gems to ~/gems
export GEM_HOME=\$HOME/gems
export PATH=\$HOME/.local/share/gem/ruby/3.0.0/bin:\$PATH
EOF
source ~/.bashrc
1
2
3
4
5
6
7
tee -a ~/.zshrc > /dev/null <<EOF

# Install Ruby Gems to ~/gems
export GEM_HOME=\$HOME/gems
export PATH=\$HOME/.local/share/gem/ruby/3.0.0/bin:\$PATH
EOF
source ~/.zshrc
Install Jekyll Bundler
1
2
gem update --user-install
gem install jekyll bundle --user-install
Creating a site based on Starter Template
Templates: https://github.com/topics/jekyll-theme
After selecting a Jekyll template, you can fork it and follow the setup instructions in the README.md file.
Site Configuration
Comments Section /W Giscus
Choose the repository giscus will connect to. Make sure that:
- The repository is
public, otherwise visitors will not be able to view the discussion. - The Giscus app is installed, otherwise visitors will not be able to comment and react.
- The Discussions feature is turned on by enabling it for your repository.
- Create dedicated section for
Comments.
Get info from GitHub Repository ID && Comments Category ID:
1
2
3
4
5
6
7
8
9
10
11
12
13
gh api graphql -f query='
{
  repository(owner: "jokerwrld999", name: "jokerwrld.github.io") {
    id # RepositoryID
    name
    discussionCategories(first: 10) {
      nodes {
        id # CategoryID
        name
      }
    }
  }
}'
Finally, complete your data in _config.yml file:
1
2
3
4
5
6
7
8
9
giscus:
    repo: jokerwrld999/jokerwrld.github.io # <gh-username>/<repo>
    repo_id:
    category: Comments
    category_id:
    mapping: pathname # optional, default to 'pathname'
    input_position: bottom # optional, default to 'bottom'
    lang: en # optional, default to the value of `site.lang`
    reactions_enabled: 1 # optional, default to the value of `1`
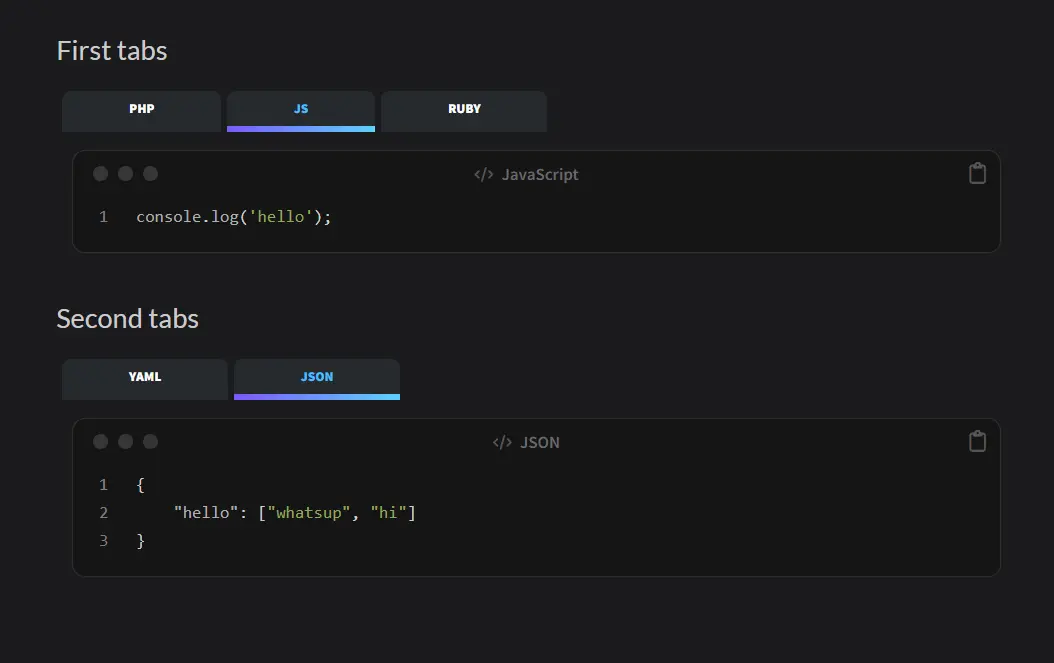
Jekyll Tabs
Refer Jekyll Tabs Project for usage info and more.
Install the plugin:
Add this line to the end of your
Gemfile:1 2 3
group :jekyll_plugins do gem "jekyll-tabs" end
Install the gem by running:
1
 bundle install
Then add the gem to the plugin list in your
_config.ymlfile:1 2
plugins: - jekyll-tabs
Style the tabs:
Depending on your Jekyll theme configuration can be different. Reference your theme documentation on how to override defaults.
Locate a theme’s files on you machine:
1
 bundle info --path chirpy
After exploring theme’s files you can now override any theme file by creating a similarly named file in your Jekyll site directory.
1
 mkdir -p assets/css assets/js
Copy the JavaScript content in your Jekyll site directory (for example
assets/js/tabs.js).1 2 3 4 5
!function(e,t){"object"==typeof exports&&"object"==typeof module?module.exports=t():"function"==typeof define&&define.amd?define([],t):"object"==typeof exports?exports.jekyllTabs=t():e.jekyllTabs=t()}(self,(()=>(()=>{"use strict";var e={973:(e,t,o)=>{o.r(t),o.d(t,{addClass:()=>r,createElementFromHTML:()=>s,findElementsWithTextContent:()=>n,getChildPosition:()=>a});const a=e=>{const t=e.parentNode;for(let o=0;o<t.children.length;o++)if(t.children[o]===e)return o},n=(e,t)=>{const o=document.querySelectorAll(e),a=[];for(let e=0;e<o.length;e++){const n=o[e];n.textContent.trim()===t.trim()&&a.push(n)}return a},s=e=>{const t=document.createElement("template");return t.innerHTML=e.trim(),t.content.firstChild},r=(e,t,o)=>{e.className=e.className?`${e.className} ${t}`:t,setTimeout((()=>{e.className=e.className.replace(t,"").trim()}),o)}},39:(e,t,o)=>{o.r(t),o.d(t,{activateTabFromUrl:()=>d,addCopyToClipboardButtons:()=>u,appendToastMessageHTML:()=>b,copyToClipboard:()=>c,handleTabClicked:()=>i,removeActiveClasses:()=>l,syncTabsWithSameLabels:()=>y,updateUrlWithActiveTab:()=>p});const{getChildPosition:a,createElementFromHTML:n,findElementsWithTextContent:s,addClass:r}=o(973),l=e=>{const t=e.querySelectorAll("ul > li");Array.prototype.forEach.call(t,(e=>{e.classList.remove("active")}))},i=e=>{const t=e.parentNode,o=t.parentNode,n=a(t);if(t.className.includes("active"))return;const s=o.getAttribute("data-tab");if(!s)return;const r=document.getElementById(s);l(o),l(r),r.querySelectorAll("ul.tab-content > li")[n].classList.add("active"),t.classList.add("active")},c=(e,t)=>{if(navigator.clipboard&&window.isSecureContext)navigator.clipboard.writeText(e);else{const t=document.createElement("textarea");t.value=e,t.style.position="absolute",t.style.left="-999999px",document.body.prepend(t),t.select();try{document.execCommand("copy")}catch(e){console.error(e)}finally{t.remove()}}"function"==typeof t&&t()},d=()=>{var e;const t=null===(e=window.location.hash)||void 0===e?void 0:e.substring(1);if(!t)return;const o=document.getElementById(t);if(!o)return;const a=new URLSearchParams(window.location.search).get("active_tab");if(!a)return;const n=o.querySelector("li#"+a+" > a");n&&i(n)},p=e=>{const t=e.parentNode,o=t.parentNode,a=new URLSearchParams(window.location.search);a.set("active_tab",t.id);const n=window.location.pathname+"?"+a.toString()+"#"+o.id;history.replaceState(null,"",n)},u=({buttonHTML:e,showToastMessageOnCopy:t,toastDuration:o})=>{const a=document.querySelectorAll("ul.tab-content > li pre");for(let s=0;s<a.length;s++){const r=a[s],l=r.parentNode,i=n(e);let d;l.style.position="relative",i.style.position="absolute",i.style.top="0px",i.style.right="0px",l.appendChild(i),t&&(d=()=>{m(o)}),i.addEventListener("click",(()=>{c(r.innerText,d)}))}},b=e=>{const t=document.createElement("div");t.id="jekyll-tabs-copy-to-clipboard-message",t.textContent=e,document.getElementsByTagName("body")[0].appendChild(t)},m=e=>{r(document.getElementById("jekyll-tabs-copy-to-clipboard-message"),"show",e)},y=e=>{const t=s("a",e.textContent);for(let o=0;o<t.length;o++)t[o]!==e&&i(t[o])}}},t={};function o(a){var n=t[a];if(void 0!==n)return n.exports;var s=t[a]={exports:{}};return e[a](s,s.exports,o),s.exports}o.d=(e,t)=>{for(var a in t)o.o(t,a)&&!o.o(e,a)&&Object.defineProperty(e,a,{enumerable:!0,get:t[a]})},o.o=(e,t)=>Object.prototype.hasOwnProperty.call(e,t),o.r=e=>{"undefined"!=typeof Symbol&&Symbol.toStringTag&&Object.defineProperty(e,Symbol.toStringTag,{value:"Module"}),Object.defineProperty(e,"__esModule",{value:!0})};var a={};return(()=>{o.r(a),o.d(a,{init:()=>i});const{activateTabFromUrl:e,updateUrlWithActiveTab:t,handleTabClicked:n,addCopyToClipboardButtons:s,syncTabsWithSameLabels:r,appendToastMessageHTML:l}=o(39),i=(o={})=>{const a={syncTabsWithSameLabels:!1,activateTabFromUrl:!1,addCopyToClipboardButtons:!1,copyToClipboardSettings:{buttonHTML:"<button>Copy</button>",showToastMessageOnCopy:!1,toastMessage:"Code copied to clipboard",toastDuration:3e3}},i=Object.assign(Object.assign(Object.assign({},a),o),{copyToClipboardSettings:Object.assign(Object.assign({},a.copyToClipboardSettings),o.copyToClipboardSettings)}),c=document.querySelectorAll("ul.tab > li > a");if(Array.prototype.forEach.call(c,(e=>{e.addEventListener("click",(o=>{o.preventDefault(),n(e),i.activateTabFromUrl&&t(e),i.syncTabsWithSameLabels&&r(e)}),!1)})),i.addCopyToClipboardButtons){const e=i.copyToClipboardSettings;s(e),e.showToastMessageOnCopy&&l(e.toastMessage)}i.activateTabFromUrl&&e()}})(),a})())); window.addEventListener('load', function () { jekyllTabs.init(); });
Paste the CSS content in a file (for example
assets/css/custom.css).1 2 3 4 5 6 7 8 9 10 11 12 13 14 15 16 17 18 19 20 21 22 23 24 25 26 27 28 29 30 31 32 33 34 35 36 37 38 39 40 41 42 43 44 45 46 47 48 49 50 51 52 53 54 55 56 57 58 59 60 61
.tab { display: flex; flex-wrap: wrap; margin: 0 5px 15px 0; padding: 0; list-style: none; position: relative; transition: all 0.7s !important; } .content a:not(.img-link):hover { color: deepskyblue !important; transition: all 0.7s !important; } .tab > * { flex: none; padding-left: 5px; position: relative; } .tab > * > a { display: block; text-align: center; padding: 3pt 40pt; color: #fff; background-color: #26292c; border-top: none !important; border-bottom: 5px solid transparent !important; border-image-slice: 1; border-radius: 7px 7px 0 0 !important; font-size: 8pt; font-weight: 800 !important; text-transform: uppercase; line-height: 20px; border-radius: 5px; cursor: pointer; } .tab > .active > a { color: deepskyblue; border-top: none !important; border-bottom: 5px solid transparent; border-image: linear-gradient( 113deg, hsl(260deg 100% 64%) 0%, hsl(190deg 100% 55%) 100% ); border-image-slice: 1; width:100%; } .tab-content { padding: 0; } .tab-content > li { display: none; } .tab-content > li.active { display: block; padding-left: 10pt; }
Include the javascript and css files:
Include the files in your
_includes(such as_includes/head.html).1 2 3 4 5 6 7 8 9
<head> ... <!-- Jekyll Tabs Stylesheet --> <link rel="stylesheet" href="/assets/css/custom.css"> <!-- JavaScript --> <!-- Jekyll Tabs --> <script src="/assets/js/tabs.js"></script> </head>
Here is the result:
Jekyll Commands
Recommended Plugin For Extending Jekyll Commands
Jekyll Compose https://github.com/jekyll/jekyll-compose
Set default front matter for drafts and posts in _config.yml file in site root directory
1
2
3
4
5
6
7
8
9
10
11
12
13
14
15
16
17
18
19
20
21
22
23
jekyll_compose:
  default_front_matter:
    drafts:
      image:
        path: /assets/img/2023/thumbs/default.webp
      categories:
        - homelab
        - linux
        - hardware
      tags:
        - servers
        - ubuntu
    posts:
      image:
        path: /assets/img/2023/thumbs/default.webp
      categories:
        - homelab
        - linux
        - hardware
      tags:
        - servers
        - ubuntu
      published: false
Usage
Create your new post using:
1
2
3
bundle exec jekyll post "My New Post"
# or
bundle exec jekyll post "My New Post" --timestamp-format "%Y-%m-%d %H:%M:%S %z"
Install gem dependencies
1
bundle install
Serving your site
1
bundle exec jekyll s
Building your site in production mode
1
JEKYLL_ENV=production bundle exec jekyll b
Deploy on GitHub Actions
Configure the Pages service
Browse to your repository on GitHub. Select the tab
Settings, then clickPagesin the left navigation bar. Then, in theSourcesection (under Build and deployment), select GitHub Actions from the dropdown menu.
Push any commits to GitHub to trigger the
Actions workflow. In theActionstab of your repository, you should see the workflowBuild and Deployrunning. Once the build is complete and successful, the site will be deployed automatically.
Set Custom Domain
Update DNS Records:
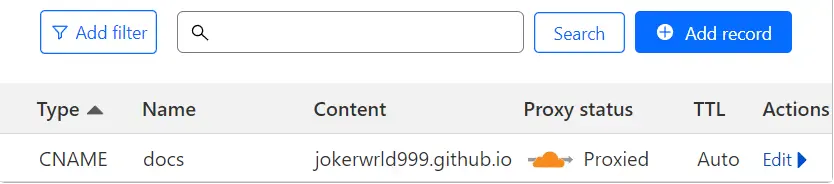
- Enable HTTPS on Cloudflare:
- In Cloudflare, go to the SSL/TLS section and configure SSL to your liking.
- Ensure the SSL mode is set to
FullorFull (strict).
- Configure GitHub Pages:
- Navigate to the repository’s settings.
- Under the
GitHub Pagessection, add your custom domain (e.g., example.com).
Creating a Post
Naming Conventions
Jekyll uses a naming convention for pages and posts
Create a file in _posts with the format
1
YEAR-MONTH-DAY-title.md
For example:
1
2
2023-05-23-homelab-docs.md
2023-07-09-hardware-specs.md
Jekyll can delay posts which have the date/time set for a point in the future determined by the “front matter” section at the top of your post file. Check the date & time as well as time zone if you don’t see a post appear shortly after re-build.
Local Linking of Files
Image from asset:
1
2
... which is shown in the screenshot below:

Linking to a file
1
... you can [download the PDF](/assets/diagram.pdf) here.
See more post formatting rules on the Jekyll site
Markdown Examples
If you need some help with markdown, check out the markdown cheat sheet
Jekyll Full Workflow
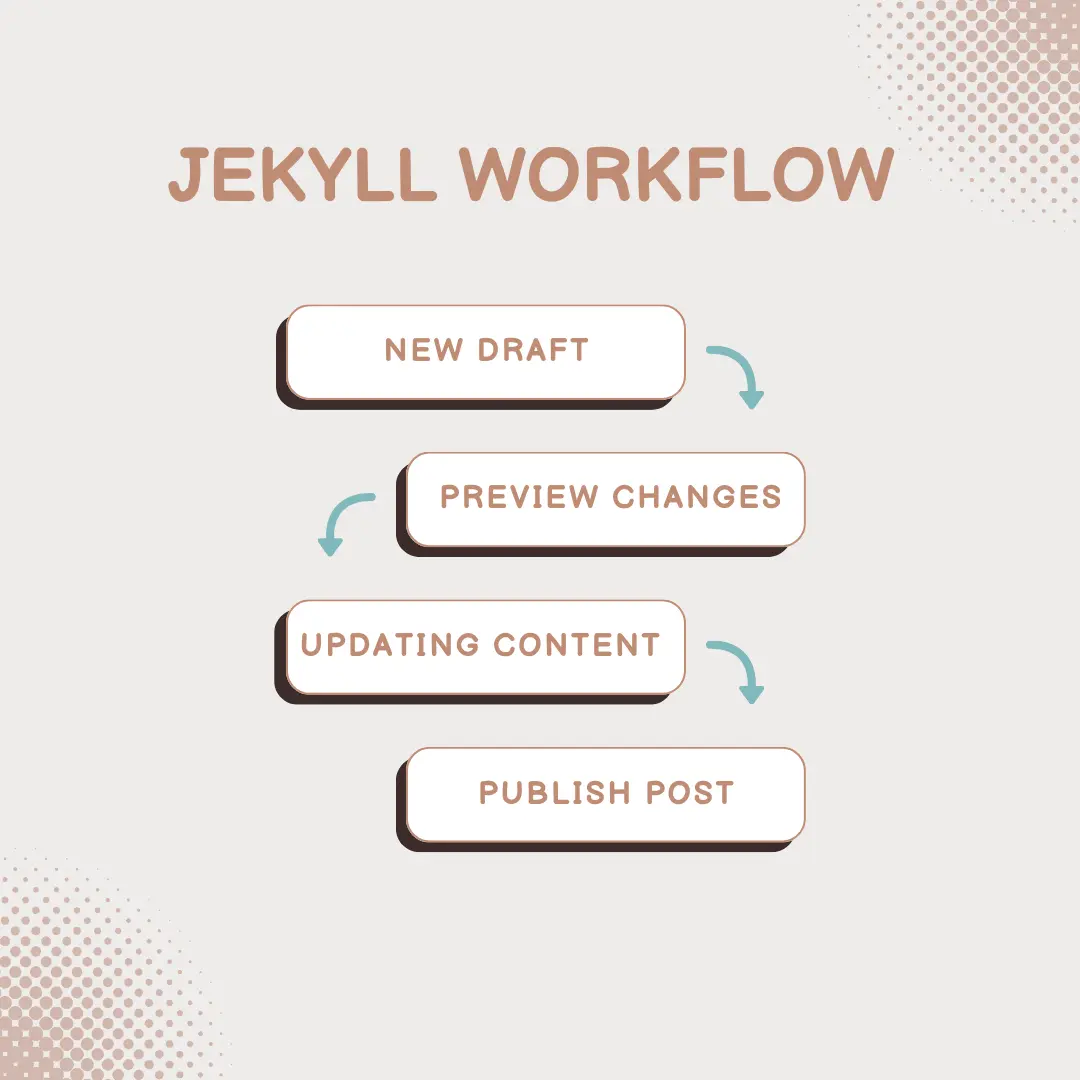
Create Your New Draft:
1
 bundle exec jekyll draft "My new draft"
Useful alias:
1
 alias draft="bundle exec jekyll draft"
Serve Your Website with Drafts:
1
 bundle exec jekyll s --drafts
Useful alias:
1
 alias jekyll="bundle exec jekyll s --drafts"
Now, you can see your changes dynamically while writing your draft on
http://127.0.0.1:4000/Publish Your Draft:
After finishing your draft you can publish it, so that it will be available in posts.
1
 bundle exec jekyll publish _drafts/my-new-draft.md
Useful alias:
1
2
3
4
5
6
7
8
9
10
11
12
 publish_draft() {
     if [ ! -d "_posts/$1" ]; then
         mkdir -p "_posts/$1"
     fi
     draft_filename="$(find ./_drafts/ -type f -name $2*.md -printf "%f\n")"
     bundle exec jekyll publish "./_drafts/$draft_filename" | grep -oP '_posts/.*?\.md' | xargs basename | read filename
     mv "_posts/$filename" "_posts/$1/$filename"
 }

 alias publish='publish_draft'

 publish "<YOUR-SUBFOLDER>" "<POST-NAME>"
You don’t actually need to start a new post from a draft, but it’s highly recommended.
Here are some helpful aliases:
1
2
3
4
5
6
7
8
9
10
11
  new_post() {
      if [ ! -d "_posts/$1" ]; then
          mkdir -p "_posts/$1"
      fi
      bundle exec jekyll post "$2" | grep -oP '_.*?\.md' | xargs basename | read filename
      mv "_posts/$filename" "_posts/$1/$filename"
  }

  alias post='new_post'

  post "<YOUR-SUBFOLDER>" "<POST-NAME>"