Optimizing Your Git Workflow: A Comprehensive Guide to Tagging, Branching, and Pull Request Strategies

Overview:
Discover the power of Git in this guide, focusing on tagging, branching, and pull request strategies. From organizing your code to collaborating effectively, we’ll break down the essentials in a beginner-friendly manner. Perfect for developers at any level, this guide aims to simplify Git workflows for smoother and more productive development.
Branching Strategies
Discover the evolution of branching strategies in Git, from the simplicity of trunk-based development to the robustness of environment-specific branches. We guide you through each strategy’s strengths, intricacies, and how to transition smoothly between them, enabling optimal collaboration and efficient development workflows.
Trunk-Based Development
Trunk-based development (TBD) is a branching model for software development where developers merge every new feature, bug fix, or other code change to one central branch in the version control system. This branch is called “trunk”, “mainline”.
Trunk-based development makes it easy to satisfy the “everyone on the development team commits to trunk at least every 24 hours” requirement of continuous integration, and lays the foundation for the codebase to be releasable at any time, as is necessary for continuous delivery and continuous deployment.
Workflow
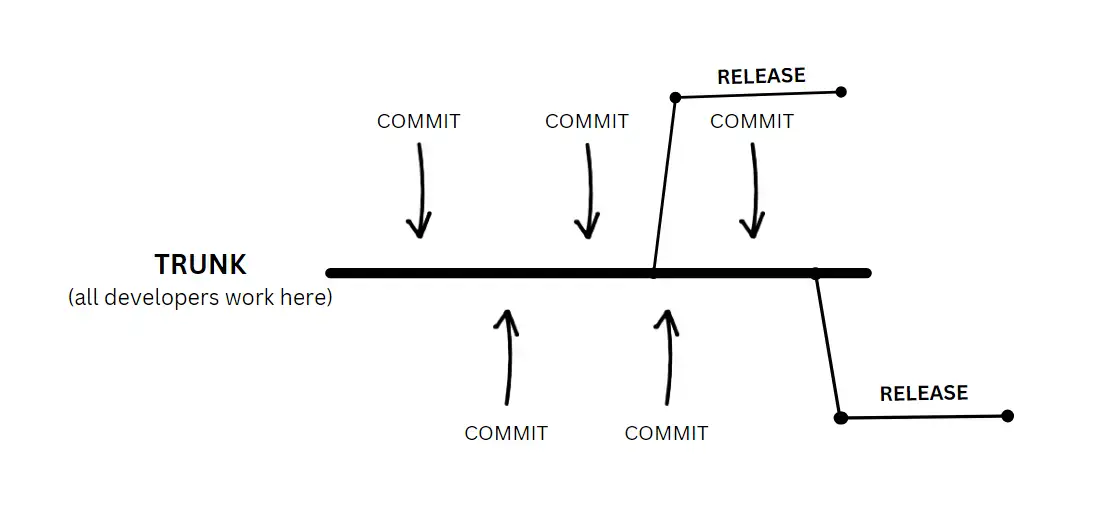
We have a single branch, the main line or trunk, and everybody is cloning that branch, making some changes locally and pushing directly to the mainline. No branches, no pull requests, none of those things.
Just working on features or bug fixes. And as soon as they are done pushing them back to the mainline, that is the easiest branching strategy. There is nothing to do.
If we’re frequently pushing changes to the mainline, which is a primary reason for utilizing trunk-based development, we must ensure not only that these changes are thoroughly tested and validated, but also that half-baked features remain hidden from users. Therefore, we require some sort of feature flags or toggles to disable these unfinished features from being visible to users, even though they may be deployed in production.
Feature Branching or GitHub Flow
Feature branching or GitHub flow involves creating new branches for each feature or hotfix, with pull requests and continuous delivery. It requires working on small chunks and short delivery cycles.
Workflow
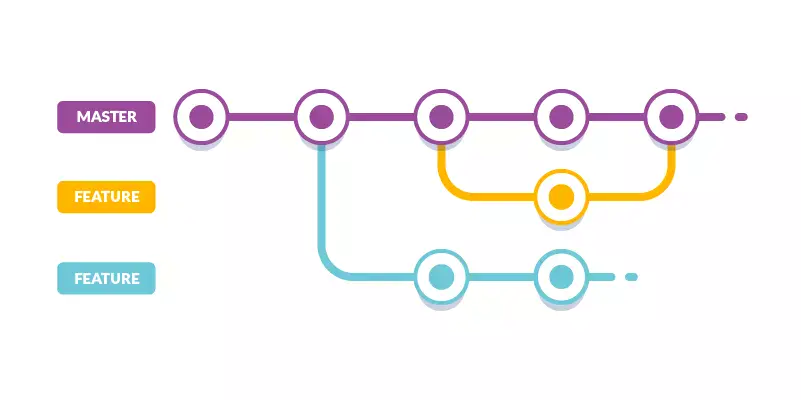
We tend to work fast when applying feature branching because features are typically split into very small chunks, so that it does not take much time to write code for something.
And once we’re finished, we create a pull request, we review that pull request, we run some automation as part of that pull request, and once everything is fine, once nobody complains about the code quality, the tests are not failing, we merge that branch back to the mainline.
Typically, a team working with feature branches would finish working on a feature within a day or even a few hours, sometimes a couple of days.
When using feature branches, usually we are doing continuous delivery or continuous integration. Continuous delivery more often than not.
If we’re not that confident in what we are doing, it could be continuous integration, but that would already be a smell that there is something wrong. Feature toggles are extremely useful. They’re not necessary, as in trunk based development, but still very, very useful.
Pull requests are a must. And we create pull requests not only when we are finished working on something, but whenever we want feedback. So it could be in the middle of development.
Forking Strategy
Forking strategy is commonly used in open source projects, where contributors fork the repository, work in their own copy, and create pull requests. It simplifies permissions and Role-Based Access Control (RBAC) management.
The major difference is that we do not create branches from the mainline. We fork whole repositories, work on something and then create a pull request back to the upstream.
Workflow
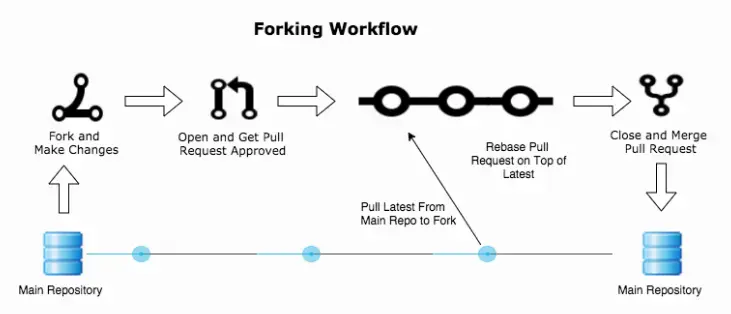
Typically in majority of cases actually, if you want to contribute to an open source project, you do not clone the repository of that project. Instead, you fork the repository, create a copy of that repository and then work in your own repository.
And when you’re done, you create a pull request. And the rest depends on the policies of each project. The major advantage of forking repos instead of creating branches is that we do not need to deal with permissions.
Anybody can fork, anybody can read and nobody can do anything else in the original repo except the maintainers.
Release Branching
Release branching is suitable for low frequency deployments and is often associated with waterfall practices. It involves creating branches for each release and merging them back to the mainline.
Workflow
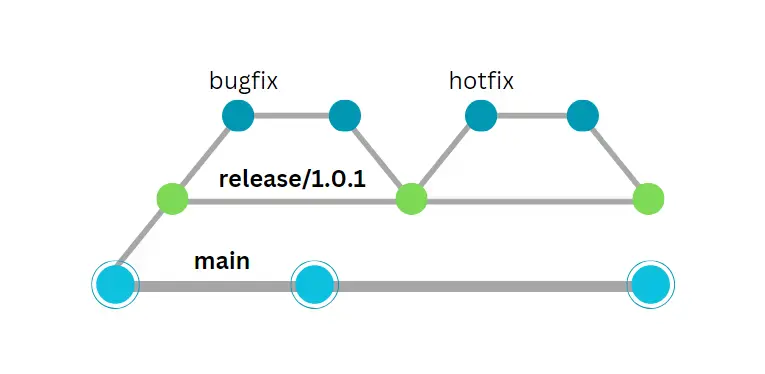
Unlike feature branches, releases normally tend to be longer lasting weeks or even months.
Since different teams might be working on different releases. Then we have a branch for each release.
One team would be working on one release, another team and another release. Typically, we would have additional branches, one for each hot fix. And that’s where situation gets a bit more complicated already.
Because eventually we are merging hot fixes and those releases to the main line. And whenever we merge something to the mainline. We need to make sure that all the currently open branches are also updated, that they pull the changes, and then bad things happen.
And then we are not continuously doing anything. The work between different teams is very discontinued and disconnected until one team is finished.
Generally speaking, you should run away from release branches unless you’re a software vendor that needs absolutely must support multiple versions. Good example. Could be kubernetes.
Kubernetes has different releases and it supports, I think, up to three previous minor releases or something like that. So they need to have different code bases, different branches, different release branches, so they can apply hot fixes things that must be done to multiple releases, to older releases of the software.
Git Flow
Git flow is a complex strategy with a development branch, feature branches, release branches, and merging to the mainline. It is often associated with dedicated release managers and can be inefficient.
Workflow
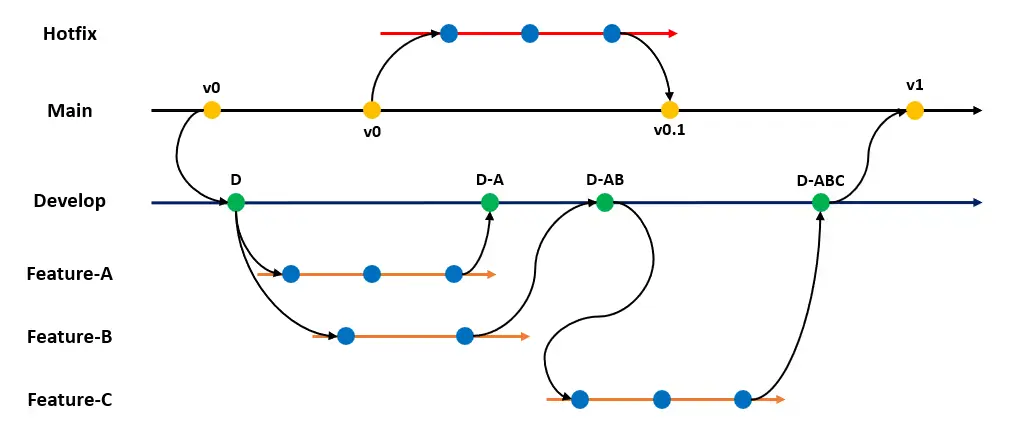
Typically when using Git Flow, we would create a development branch and from that branch we would create feature branches, like feature one, feature two, and so on and so forth. And then we would create release branches also from the dev branch. Those release branches need to be merged to dev branch as well, so that it’s more or less sometimes eventually up to date.
And release branches are also merged to the mainline. Because mainline as well, the reflection of production.
We have release management or release managers who are doing all the heavy lifting and merging and branching and the madness. It’s a job, it’s a role in a company.
Environment Branching
Environment branching is the most complicated strategy, involving branches for each environment.
Workflow
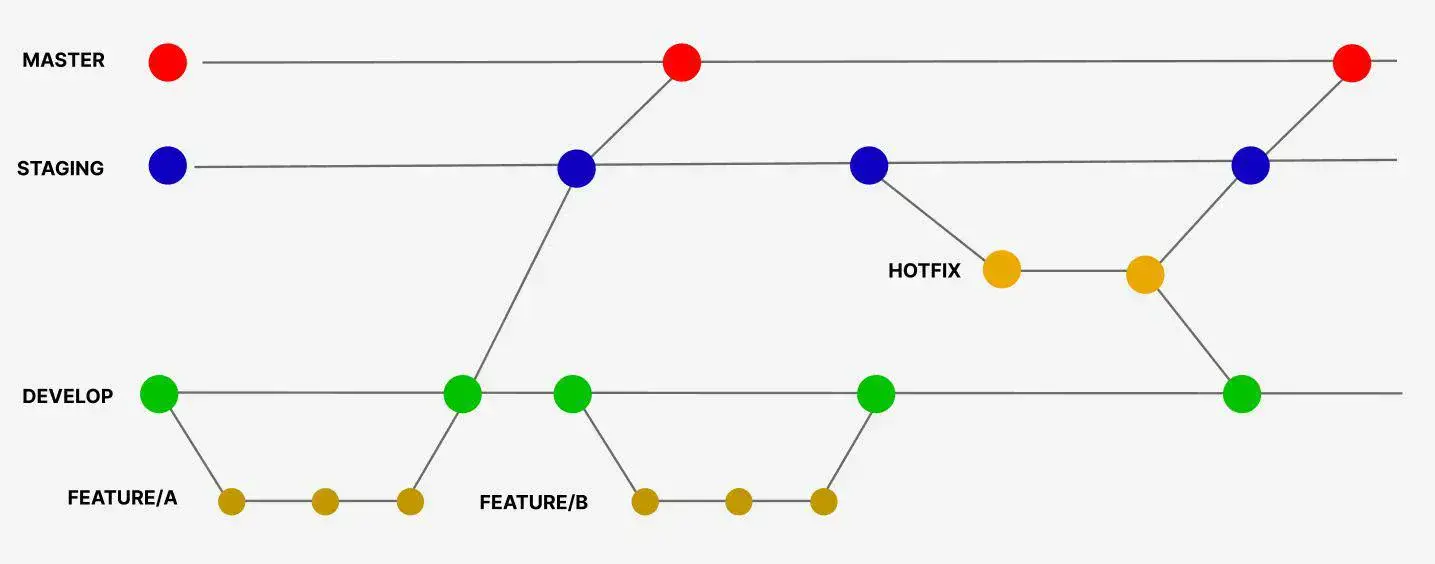
We have a development branch and then we have a branch for every environment, like staging, integration, production.
And then everything needs to be merged everywhere and everything needs to pull everything. Everything is multiplied by the number of releases we have in parallel. And that’s not all. We have hot fixes as well.
Which strategy should you use?
In summary, choosing the appropriate development strategy depends on several factors. Here’s a simplified breakdown:
Trunk-Based Development:
- For those with robust testing automation and high test coverage.
- Suitable for “superheroes” who trust their tests and can push directly to the mainline.
- Also for those who prioritize speed over quality and are okay with deploying rapidly.
Feature Branches:
- Ideal for small, self-sufficient teams working on small, fast-to-complete tasks.
- Well-suited for managing potentially small applications effectively.
Forking (Open Source):
- A common strategy in open source projects where contributors fork the repository.
- Simplifies permissions and access management, allowing a more decentralized contribution process.
Release Branches:
- Used when maintaining backwards compatibility and applying hotfixes to older releases is crucial.
- Appropriate for scenarios that don’t align with the above strategies.
Transitioning:
- Consider switching to feature branches or release branches if your current strategy isn’t effective.
- Alternatively, leaving the existing approach and opting for a different strategy might be a valid choice.
Ultimately, the choice should align with your team’s structure, project scale, and goals, ensuring efficient development while managing code stability and quality.
GitHub Cli
GitHub CLI (gh) is a command-line interface for GitHub, providing an easy way to work with GitHub repositories, issues, pull requests, and more directly from the command line. It allows you to perform various GitHub actions without needing to use the GitHub web interface.
Installation
1
sudo apt install gh
1
winget install -e GitHub.cli
1
brew install gh
First Login
1
gh auth login
Choosing SSH during login offers a more secure and efficient authentication method by utilizing cryptographic keys instead of passwords. It enhances security, simplifies the authentication process, and facilitates automated workflows, making it a preferred option for GitHub access.
Basic Commands
List Repositories:
1
gh repo list
Lists repositories associated with your GitHub account.
Clone Repository:
1
gh repo clone <repository_url>
Clones a GitHub repository to your local machine.
Create Repository:
1
gh repo create <repository_name>
Creates a new GitHub repository with the specified name.
Configure your Git Project
It is recommended to set your identity to associate local commits with.
1
2
git config --local user.email ""
git config --local user.name ""
By utilizing --local option you save your config to the repo’s .git directory .git/config so that your config always present.
GitHub Workflow
Commit Often and Push Regularly
Make frequent commits to capture changes and progress in your codebase. Push your commits to the repository regularly, especially at the end of the day or when reaching a significant milestone. This ensures your work is backed up and available to collaborators.
Utilize Branches
Use branches to isolate work and develop new features or fixes without affecting the main codebase.
Create a New Branch:
1
git branch <branch_name>
Create a new branch at the current commit.
Switch to a Branch:
1
git checkout <branch_name>
Switch to an existing branch.
Create a New Branch and Switch:
1
git checkout -b <branch_name>
Create a new branch and switch to it in one command.
Merge a Branch:
1
git merge <branch_name>
Merge the specified branch into the current branch.
Delete a Branch:
1
git branch -d <branch_name>
Delete a local branch.
Delete a Remote Branch:
1
git push origin --delete <branch_name>
Delete a remote branch.
Tagging
Use tags to mark significant points in your repository’s history, such as releases or major updates.
Create a Tag:
1
git tag <tag_name>
Create a new lightweight tag at the current commit.
Create an Annotated Tag:
1
git tag -a <tag_name> -m "Tag description"
Create an annotated tag with a message.
Push Tags to Remote:
1
git push origin <tag_name>
Push a specific tag to the remote repository.
Semantic Versioning:
Consider using semantic versioning when tagging releases to convey meaningful information about the changes in each release (e.g.,
v1.0.0,v1.1.0).
Collaborative Development
Pull Requests:
Open a pull request to propose changes, allowing for discussion, review, and collaboration before merging into the main branch.
Review and Merge:
Ensure that code changes go through a review process, and only merge into the main branch after necessary approvals and successful automated tests.
Following this GitHub workflow promotes a structured and collaborative approach to development, enabling efficient version control and seamless integration of new features or bug fixes into your project.
Quick Aliases
You can create aliases for Git commands to simplify and customize your Git workflow. Aliases can be set up in shell profiles on different OSs.
1
2
3
4
5
6
7
8
9
10
11
12
13
14
15
16
17
18
19
20
21
22
23
24
25
26
27
28
29
30
31
32
alias gpush='git push'
alias gst='git status'
alias greset="git fetch --all && git reset --hard origin/main"
alias gfixup="GIT_SEQUENCE_EDITOR=\"curl -s https://raw.githubusercontent.com/jokerwrld999/py-automation/main/scripts/fixup/main.py | python -\" git rebase -i --root"

# >>>> Functions
# Git commit
gcom() {
    git add .
    git commit -m "$1"
}

# Lazy git push
lazyg() {
	git add .
	git commit -m "$1"
	git push
}

# Git clone repo and go to the directory
gclone() {
	repo_name=$(basename "$1" ".git")
	git clone "$1"
	cd $repo_name
}

# Gh clone repo and go to the directory
ghclone() {
	repo_name=$(basename "$1" ".git")
	gh repo clone "$1"
	cd $repo_name
}
Full Git Workflow
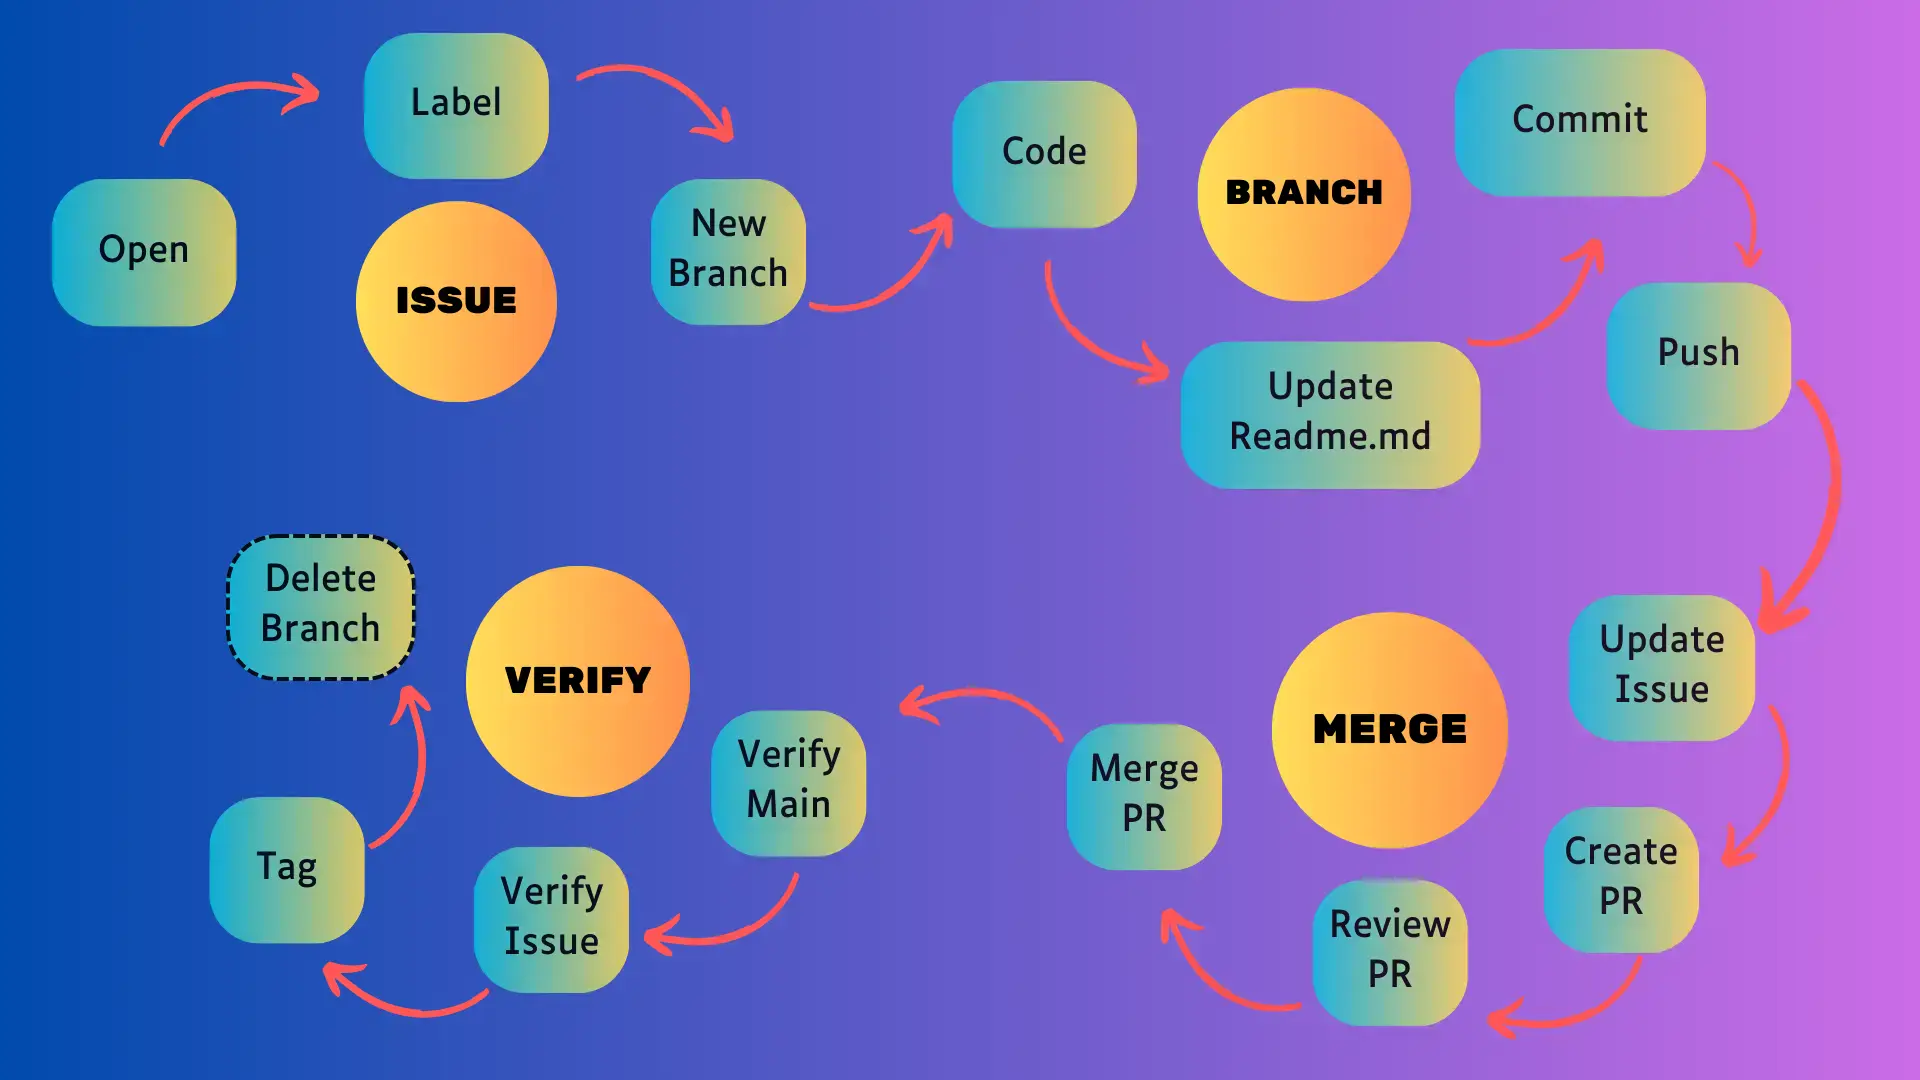
Open New Issue:
1
2
 gh issue create --title "I found a bug" --body "Nothing works" \
 --label [bug | documentation | enhancement | invalid | question]
Create New Branch on Issue:
1
2
 gh issue develop 123 --base my-feature --checkout
 gh issue develop 123 -c # shorter version
Modify newly created issue if needed:
1
2
 gh issue view 123
 gh issue edit 123 --add-label enhancement # add label
Make Changes and Commit:
1
2
 git add .
 git commit -m "#1 Commit Message"
Rebase a Branch (If Needed) && Push Changes:
1
2
3
 git fetch origin main
 git rebase main
 git push
Create a Pull Request:
1
 gh pr create
Review, Approve, and Merge:
If working in a team, wait for other team members to review the pull request, provide feedback, and approve the changes. Once approved, merge the pull request.
If working alone, review the changes yourself, ensure they meet the project requirements, and proceed to merge the pull request.
1
2
 gh pr list
 gh pr merge --admin -s -d # merge pr that doesn't meet reqs e.g. no one is approved pr, squash and delete branch
Verify and Tag:
1
2
3
4
5
 git checkout main
 git pull
 git tag -l
 git tag 0.1.0
 git push --tags
Delete Branch (If Needed):
1
2
3
 git branch -d old-branch
 git push origin --delete old-branch
 git fetch -p # synchronize your branch list
This Git workflow helps in managing tasks, versioning, and collaboration efficiently within a Git-based project.