TrueNAS Scale: Elevate Your Storage Game with Scalability
File Systems Fundamentals
File system information is categorized into two main parts: data and metadata. Data comprises the actual blocks, records, or any other grouping that the file system uses to constitute a file. Metadata includes pieces of information describing a file, such as its reference, location, creation time, and permissions. While data is the content of the file, metadata provides essential details about the file itself.
Journaling File Systems
Journaling is a technique employed by many modern file systems, including NTFS, ext4, and XFS. The process involves maintaining a special log file known as the journal, where the file system records all its actions before executing them. The primary purpose of journaling is to enhance the reliability and recovery capabilities of the file system.
- Action Recording:
- Before performing any action, the file system records the action in the journal.
- Action Execution:
- The file system executes the action, whether it’s creating, modifying, or deleting files or directories.
- Journal Investigation (In Case of Crash):
- If the operating system crashes during an action, the file system can investigate the journal on the next system boot.
- Completing Actions:
- The file system completes any actions recorded in the journal that were not finalized due to the crash.
Advantages of Journaling
- Enhanced Reliability:
- Journaling improves the reliability of file systems by providing a consistent and recoverable state, especially in the event of an unexpected system crash.
- Faster Recovery:
- In case of a crash, the file system can quickly recover by examining the journal and completing any pending actions on the next system boot.
- Metadata Integrity:
- Journaling primarily focuses on logging metadata changes, ensuring the integrity and consistency of critical file system information.
Use Cases for Journaling File Systems
- Operating System Integrity:
- Journaling is essential for the integrity of the operating system, ensuring that file system actions are completed even in the face of unexpected failures.
- Transactional Systems:
- Journaling is commonly used in systems where transactional consistency is crucial, such as databases and critical server environments.
- Data Recovery:
- The journaling process aids in the recovery of data and file system consistency after an unexpected system crash.
- Critical File System Operations:
- Journaling is particularly beneficial for critical file system operations, where maintaining the integrity of metadata is vital.
Copy-on-Write
Copy-on-Write (COW) is a data storage strategy employed by some file systems and database systems to optimize resource utilization and improve system performance. The core idea behind Copy-on-Write is to defer the duplication (copying) of data until it is necessary, rather than making a redundant copy of data immediately. This approach is particularly useful in scenarios where data is frequently read and rarely modified.
Here’s how Copy-on-Write typically works:
- Initial Read:
- When a piece of data needs to be read or accessed, the system does not create an immediate duplicate copy.
- Modification Request:
- If a write or modification operation is requested on the data, Copy-on-Write comes into play.
- Copy Operation:
- Instead of modifying the existing data in place, a new copy of the data is created. The modification is made to the copy.
- Update Reference:
- The reference to the original data is updated to point to the newly created copy.
Copy-on-Write has several advantages and use cases:
Efficiency in Read-Heavy Workloads: In scenarios where data is predominantly read rather than modified, COW can be more efficient. It avoids unnecessary copying until a modification is needed.
Reduced Overhead: Immediate duplication of data for write operations can lead to unnecessary storage overhead, especially if the data is never modified again. COW minimizes this overhead.
Snapshot Creation: Copy-on-Write facilitates the efficient creation of snapshots. Since creating a snapshot involves copying only the modified data, it can be faster and less resource-intensive.
Consistency and Atomicity: Copy-on-Write ensures that modifications are atomic. If a failure occurs during the write operation, the original data remains intact.
ZFS
Zpools, vdevs, and devices
How fast are your disks? Find out the open source way, with fio
ZFS 101—Understanding ZFS storage and performance
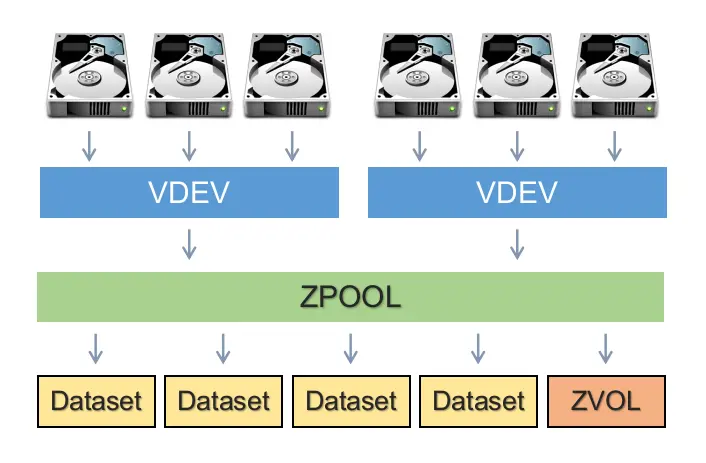
The ZFS (Zettabyte File System) architecture consists of several key components, each playing a crucial role in the organization and management of storage. Here’s an overview of the terms and concepts related to ZFS:
- Zpool:
- A Zpool is the highest-level construct in ZFS, representing a storage pool that can contain one or more vdevs. Zpools are independent units, and each may consist of various vdevs.
- Vdev (Virtual Device):
- A vdev is a virtual device within a Zpool and is composed of one or more physical devices. Vdevs can have different topologies, including single-device, RAIDz1, RAIDz2, RAIDz3, or mirror. Each vdev is responsible for redundancy at its level, and the loss of a vdev can result in data loss for the entire Zpool.
- RAIDz:
- RAIDz1, RAIDz2, and RAIDz3 are specific types of vdevs in ZFS, implementing diagonal parity RAID. These RAIDz levels determine how many parity blocks are allocated to each data stripe, providing fault tolerance up to a certain number of disk failures.
- Mirror Vdev:
- A mirror vdev stores each block on every device within the vdev. It provides redundancy by duplicating data across multiple disks. A mirror vdev can withstand the failure of multiple devices, as long as at least one device remains healthy.
- Single-Device Vdev:
- A single-device vdev is composed of a single physical device. It is inherently risky, as it cannot survive any failures. If a single-device vdev fails, it can bring down the entire Zpool.
- CACHE, LOG, and SPECIAL Vdevs:
- These are special types of vdevs that serve specific purposes:
- CACHE Vdev: Used for read and write caching.
- LOG Vdev: Used for synchronous transaction logging to improve write performance.
- SPECIAL Vdev: Used for devices that require dedicated storage, and their failure can result in the loss of the entire Zpool.
- These are special types of vdevs that serve specific purposes:
- Device:
- A device in ZFS is a random-access block device, typically a disk (HDD or SSD). Devices can be organized into vdevs, which, in turn, form Zpools. ZFS also supports the use of entire hardware RAID arrays as individual devices.
- Raw File:
- A simple raw file is an alternative block device that can be used to create vdevs in ZFS. This allows users to practice ZFS commands and test pool configurations using sparse files.
Understanding these ZFS terms is crucial for effectively managing storage with ZFS and making informed decisions about pool and vdev configurations based on redundancy and performance requirements.
Datasets, blocks, and sectors
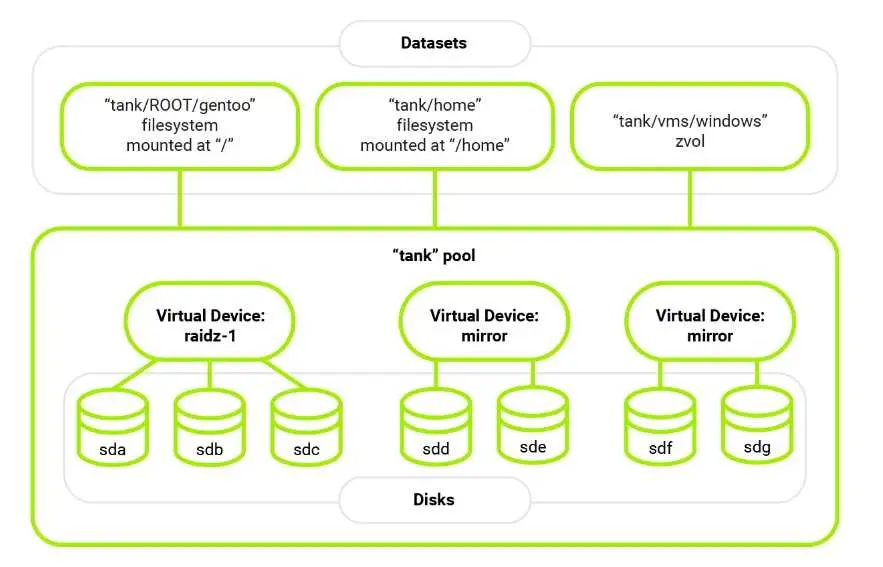
In the context of storage systems and file systems, datasets, blocks, and sectors are terms that refer to different levels of data organization and storage.
- Dataset:
- A dataset is a collection of related data or files. In file systems, a dataset is often synonymous with a directory or folder that contains files. However, in some storage systems, especially in the context of ZFS, a dataset can be more than just a directory; it can represent a more complex structure with properties and settings.
- Blocks:
- Blocks are units of storage used by file systems to manage data. A block is typically a fixed-size allocation of storage space, and it is the minimum amount of data that can be read or written at a time. File systems organize data into blocks to efficiently manage storage and facilitate data retrieval. The block size can vary depending on the file system and the configuration.
- Sectors:
- Sectors are the smallest addressable unit on a physical storage device such as a hard disk drive (HDD) or a solid-state drive (SSD). A sector is a fixed-size unit of storage on the disk surface. Historically, the standard sector size was 512 bytes, but modern storage devices often use larger sector sizes, such as 4 KB (4096 bytes).
In summary, datasets represent collections of related data or files, blocks are units of storage used by file systems for data management, and sectors are the smallest addressable units on physical storage devices. The concepts of datasets and blocks are more closely associated with file systems and logical data organization, while sectors are a lower-level concept related to the physical structure of storage devices. Understanding these terms is essential for effectively managing and organizing data in storage systems.
File Sharing
When it comes to network protocols for sharing files and storage, SMB, NFS, AFP, and iSCSI are common choices, each with its own characteristics and use cases.
Now, let’s explore each protocol individually:
- SMB (Server Message Block):
- Originating from Windows, SMB is widely supported and excels in compatibility. It’s ideal for mixed environments and offers excellent performance for large sequential read and write operations. Aim for SMB v3 for enhanced security and features.
- AFP (Apple Filing Protocol):
- Developed by Apple, AFP was once the go-to protocol for macOS environments. However, it has been deprecated, and it’s recommended to use SMB for broader compatibility and ongoing support. AFP may offer slightly faster speeds on macOS, but the trade-offs make it less favorable.
- NFS (Network File System):
- NFS is a Linux-centric protocol that can be incredibly fast with the right tuning. It’s suitable for Linux to Linux file sharing, offering high performance for small, sequential file transfers. While more complex to set up and less user-friendly than SMB, NFS shines in enterprise environments with specific needs.
- iSCSI (Internet Small Computer System Interface):
- Unlike the file-based protocols, iSCSI is a block-based sharing protocol. It provides direct access to a virtual hard drive on the NAS, making it excellent for applications that require ultra-low latency and direct disk access. iSCSI is beneficial for virtualized environments, offering flexibility and centralized storage control.
Remember, iSCSI is not recommended for general home use unless you have specific requirements, as it involves complexities like ejecting disks and potential file corruption if not managed carefully.
In conclusion, SMB is the go-to choice for most users due to its broad compatibility and ease of use. AFP is deprecated, NFS is powerful but more complex, and iSCSI serves specific use cases in advanced setups. Choose the protocol that aligns with your specific needs and environment.
Advanced Storage Solutions: LVM and RAID
In the realm of advanced storage solutions, LVM (Logical Volume Manager) and RAID (Redundant Array of Independent Disks) play crucial roles in optimizing storage performance, reliability, and flexibility. Let’s explore these concepts:
LVM (Logical Volume Manager)
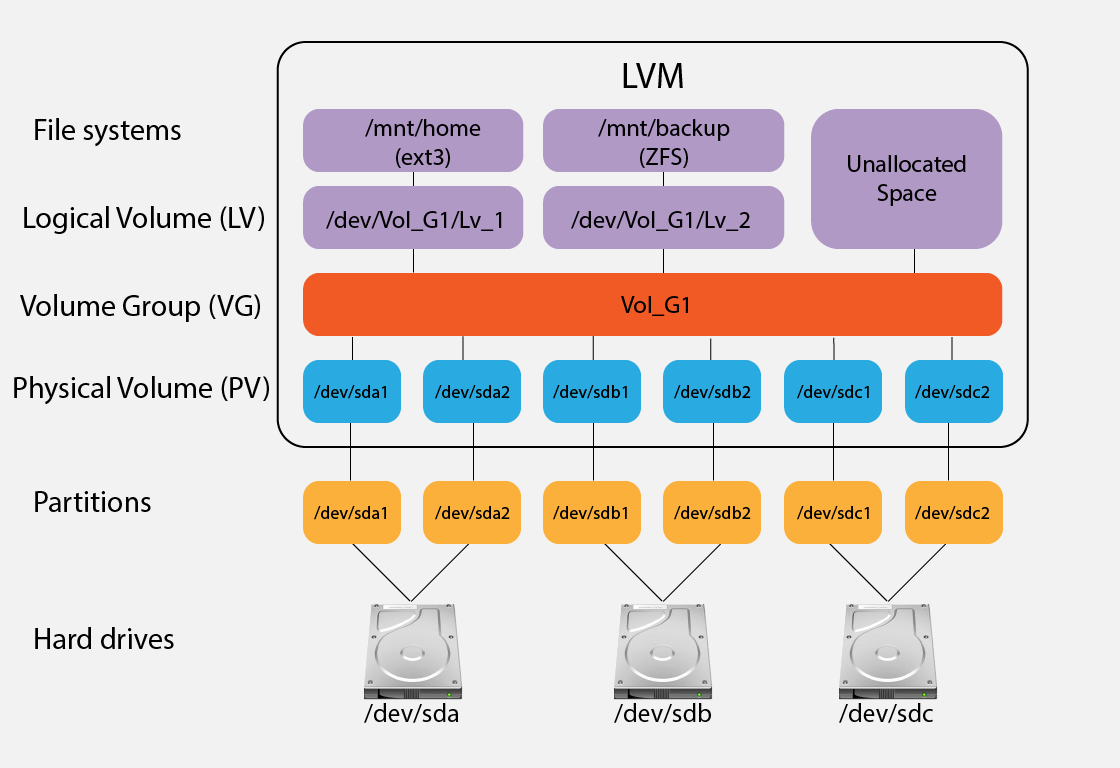
Overview:
- LVM is a logical volume management tool for Linux that allows users to manage disk space more dynamically.
- It enables the creation of logical volumes (similar to partitions) that can span multiple physical disks.
- LVM provides features like resizing volumes, snapshotting, and dynamic striping.
Advantages:
- Dynamic Volume Management:
- LVM allows resizing of volumes on-the-fly, providing flexibility in adjusting storage allocations as needed.
- Snapshotting:
- Snapshots enable the creation of point-in-time copies of volumes, useful for backup purposes or testing.
- Spanning Across Disks:
- Logical volumes can span multiple physical disks, improving storage utilization and distribution.
RAID (Redundant Array of Independent Disks)
Overview:
- RAID is a storage technology that combines multiple physical disks into a single logical unit to enhance performance, redundancy, or a combination of both.
- Different RAID levels offer various benefits, such as data redundancy, improved performance, or a balance of both.
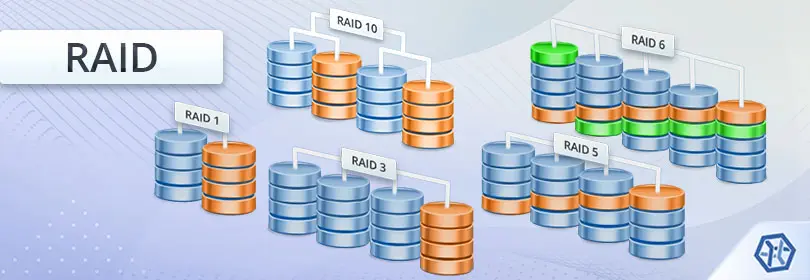
Common RAID Levels:
- RAID 0 (Striping):
- Improves performance by striping data across multiple disks. However, it offers no redundancy, and a failure of one disk results in data loss.
- RAID 1 (Mirroring):
- Provides redundancy by mirroring data across two disks. If one disk fails, the data is still available on the mirrored disk.
- RAID 5 (Striping with Parity):
- Balances performance and redundancy by striping data across multiple disks with parity for fault tolerance. It can tolerate the failure of one disk.
- RAID 10 (Combination of Mirroring and Striping):
- Offers a combination of mirroring and striping, providing both redundancy and improved performance. Requires a minimum of four disks.
Advantages:
- Redundancy:
- RAID levels like 1, 5, and 10 provide data redundancy, ensuring that the failure of one disk doesn’t result in data loss.
- Improved Performance:
- RAID 0 and RAID 10 enhance performance by striping data across multiple disks or combining mirroring with striping.
Considerations:
- Data Security:
- While RAID provides redundancy, it is not a substitute for regular backups. Regular backups are crucial to safeguard against data loss due to various factors.
- Performance vs. Redundancy:
- Choose a RAID level based on your specific needs, balancing performance requirements with the level of redundancy desired.
Integration of LVM and RAID
- LVM and RAID can be used together to achieve more sophisticated storage configurations.
- For example, you can create logical volumes on a RAID array, combining the flexibility of LVM with the redundancy or performance benefits of RAID.
In summary, LVM and RAID are powerful tools in the realm of storage management. LVM enhances flexibility and dynamic management, while RAID provides options for performance improvement and data redundancy. Depending on your specific use case, combining these technologies can result in a robust and adaptable storage infrastructure.
TrueNAS Scale

In the dynamic landscape of open-source storage tools, TrueNAS Scale, an open-source project by iXsystems, stands out as a robust platform for efficient data management and storage. In this article, we’ll delve into the intricacies of TrueNAS Scale, exploring its features, advantages, and use cases. Additionally, we’ll introduce some noteworthy alternatives, each bringing its unique set of benefits to the tool-centric ecosystem.
TrueNAS Scale, built upon the solid foundation of Debian Linux and combining the flexibility of ZFS with containerization using Docker and Kubernetes, extends the capabilities of TrueNAS CORE into a hyper-converged infrastructure solution.
Key Features of TrueNAS Scale
ZFS Integration: TrueNAS Scale leverages the power of the ZFS file system, providing robust data integrity, efficient snapshots, and a simplified management interface.
Containerization with Docker and Kubernetes: The integration of Docker and Kubernetes allows users to deploy, manage, and scale applications seamlessly, enhancing the platform’s versatility.
Hyper-Converged Infrastructure: TrueNAS Scale unifies storage and compute resources, streamlining data management and optimizing resource utilization.
Web-Based Management Interface: A user-friendly web interface simplifies configuration, monitoring, and maintenance tasks, making TrueNAS Scale accessible to both novices and experienced users.
Alternatives to TrueNAS Scale
While TrueNAS Scale offers a comprehensive toolset, exploring alternatives can be beneficial based on specific use cases and preferences. Here are some notable tool-centric alternatives:
TrueNAS CORE (formerly known as FreeNAS): A mature and stable storage-focused solution with an emphasis on enterprise-grade features.
OpenMediaVault: An open-source NAS solution with a user-friendly suitable for home and small business environments.
Rockstor: A Linux-based NAS solution focusing on scalability and flexibility, utilizing Btrfs for advanced storage features.
Installation
TrueNAS SCALE can be installed either on bare metal or a virtual machine (VM). Just download the .iso file, and start installing it.
Minimum System Requirements
- Processor:
- 64-bit processor (Intel or AMD).
- RAM:
- 8 GB RAM (more recommended for better performance).
- Storage:
- Minimum 32 GB boot device (USB or SSD).
- Additional storage for data based on your requirements.
- Network Interface:
- Gigabit Ethernet (10GbE or higher for larger deployments).
Setting Up TrueNAS
Now, we will explore how to do base setup, create users, datasets, shares and configure appropriate permissions.
Data Protection
Ensuring Disk Health with S.M.A.R.T. Tests in TrueNAS
S.M.A.R.T. (Self-Monitoring, Analysis, and Reporting Technology) is a monitoring system built into hard drives, solid-state drives, and other storage devices. It provides information about the health, performance, and potential issues of the device. TrueNAS Scale utilizes S.M.A.R.T. monitoring to assess the condition of storage drives and predict potential failures.
In the realm of TrueNAS system maintenance, prioritizing the health of your storage disks is paramount. To achieve this, regular S.M.A.R.T. Tests are essential, offering insights into the overall condition of your drives. These tests come in two variants - Short and Long, each serving a distinct purpose in preemptively identifying potential failures.
The first, a Short S.M.A.R.T. Test, is set to run weekly. This brief examination provides a quick overview of the drives’ well-being, making it a valuable routine. The schedule is meticulously set for Sundays at 02:00 a.m., ensuring minimal disruption to system operations.
Simultaneously, a Long S.M.A.R.T. Test is configured for a bimonthly schedule, occurring every other month. Recognizing the extended duration of these tests, this periodicity strikes a balance between thorough examination and practicality.
It’s noteworthy that S.M.A.R.T. Tests are not automatically enabled, emphasizing the importance of manually setting them up. This ensures a hands-on approach to disk health management, aligning with the user’s specific requirements and preferences.

The recommendation is to include all drives in these tests unless there’s a specific reason to focus on one. Tailoring the frequency or scope based on individual drive performance is a wise approach.
Understanding the Importance of Scrubbing in TrueNAS
A scrub operation within TrueNAS is a vital process in maintaining the integrity of your data pool. This meticulous procedure involves reading every single file stored in the pool, conducting thorough checks on checksums, and ensuring there are no lurking errors.
The effectiveness of scrubs lies in their ability to handle mildly corrupted files. The operation is adept at fixing these issues during its routine checks, provided the corruption hasn’t reached an irreparable state. This capability makes scrubs a crucial component of your data maintenance strategy.
TrueNAS, by default, enables scrubs, but users have the flexibility to customize settings. It’s important to note that scrubs operate on a per-pool basis, and adjusting the frequency should be aligned with your specific storage environment and performance considerations.
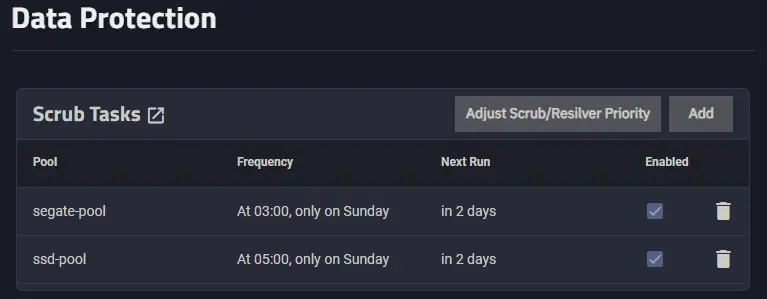
Running scrubs regularly is imperative. The frequency recommended by TrueNAS is at least every three months. While some might find weekly scrubs too aggressive, especially for large-scale multi-petabyte pools, it ultimately depends on the size and usage patterns of your storage.
Managing Users
In the Credentials tab we can create and configure local users and groups. It’s highly recommended to create admin user account with least privileges.
More info you can find about Credentials tab on official Documentation Hub
Datasets
In the Datasets tab we are able to manage our datasets, you can think of datasets as folders or containers for your data in pool. You can create multiple datasets per pool that for different purposes like shares, block storages, apps configs and data with configured Permission ACLs.
You can checkout more details about Adding and Managing Datasets
The
Share Typeis very important if you chooseGenericit will use Unix permissions if you chooseSMBorAppsit will use the more advanced ACLs. These can be switched later, but if you don’t have this correct you will not be able to get this working properly.
Shares
File sharing is one of the primary benefits of a NAS. In the TrueNAS Shares tab you can set up different share types like Windows (SMB) Shares, Block (iSCSI) Shares Targets, UNIX (NFS) Shares.
On official Documentation Hub you can get more info about how to enable file sharing.
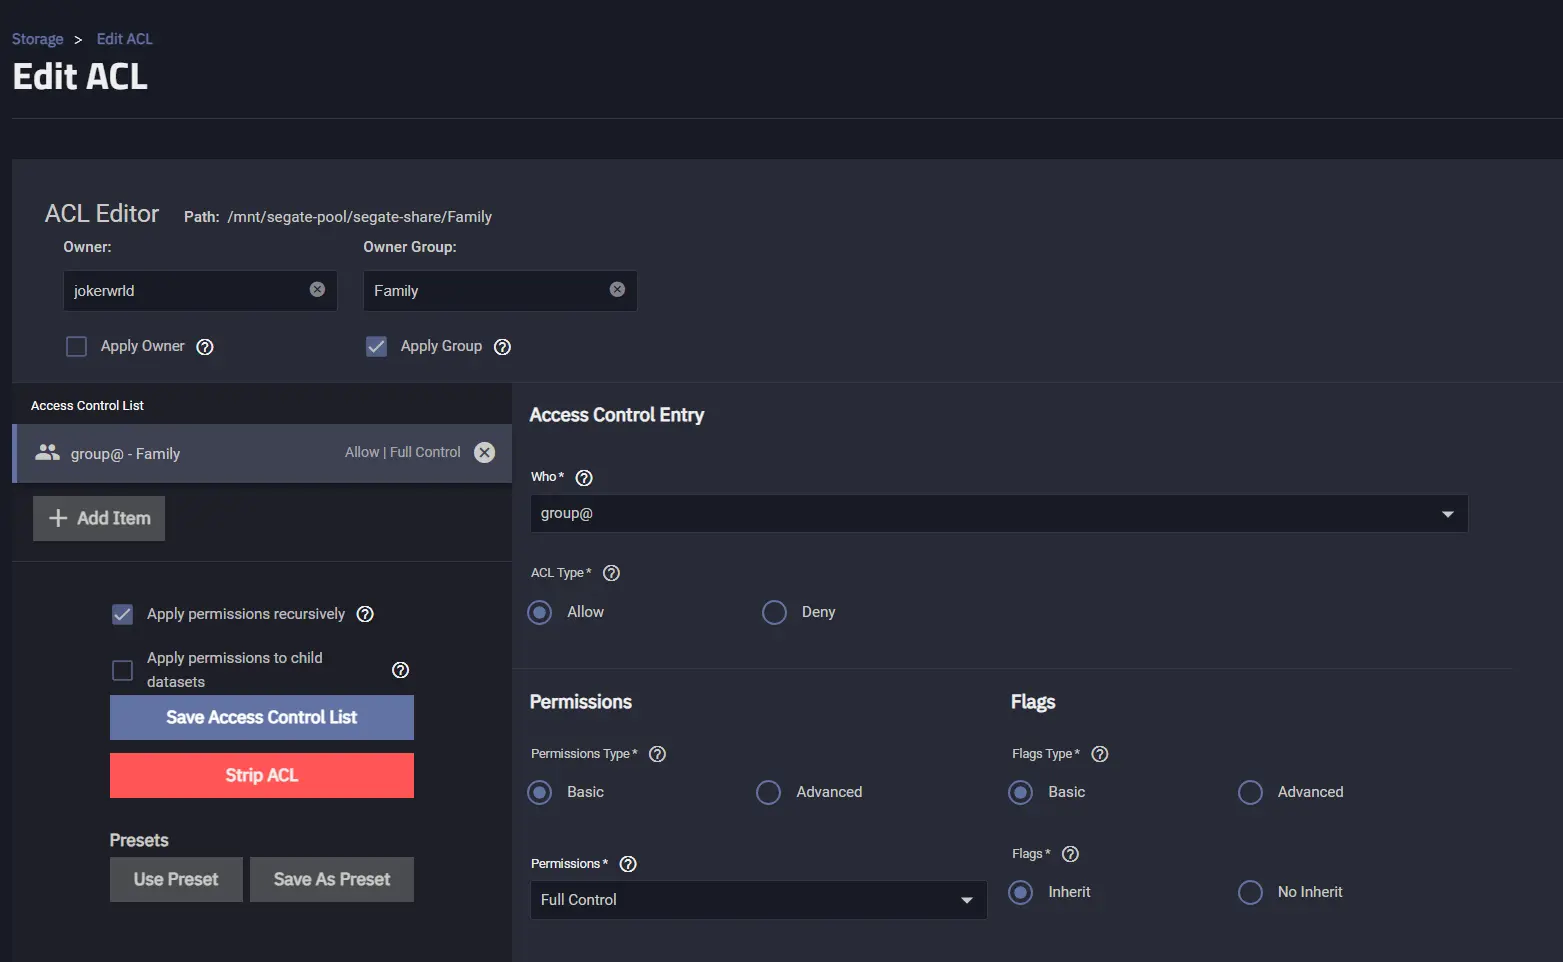
Setting Dataset Permissions
It’s important ot note that all of your ACLs are applied to datasets.
You can create a nested dateset that has different permissions than the parent one. Just add a dataset to already existing one, for example, Family, choose Share Type as SMB even if it’s a nested one and it will prompt us to go right to the ACL Manager. Now, in the Custom ACL Editor we want to make sure that we have the word Family in the Owner Group field and choose Apply Group. And in the Access Control List we need to add an item group@ and set Full Control permissions, also applying them Recursively, and finally we can save our ACL.
When you change users and members of groups Samba re-reads that on restart so we need to stop and start
SMBservice to reload and grab all the group information and apply the permissions.
Now, after successfully applying all needed permissions just members of the Family group are able to access the content of that share.
Apps
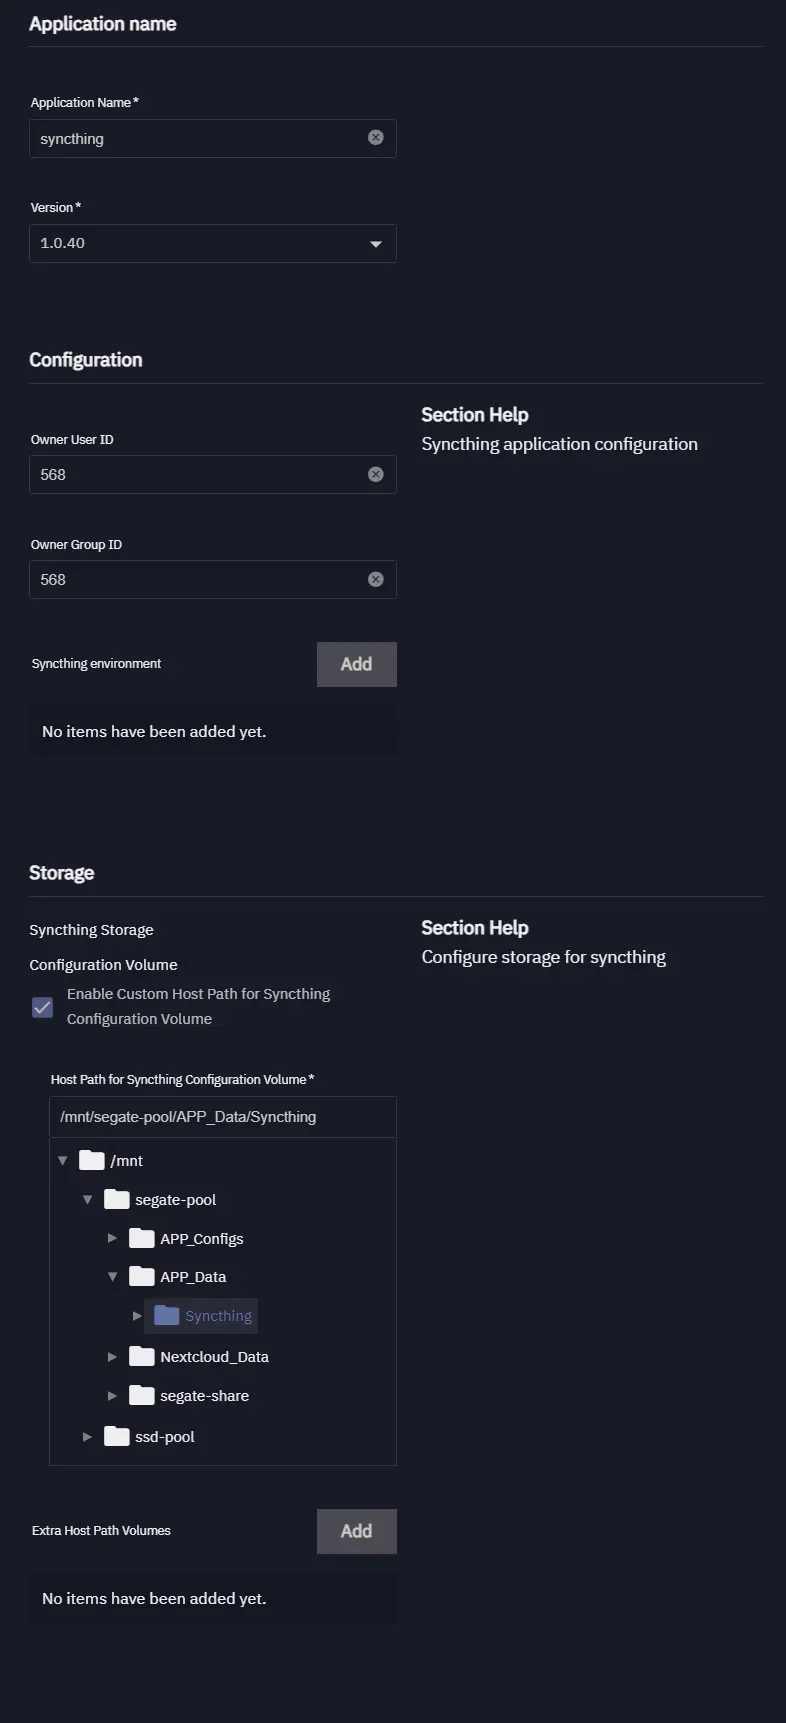
The concept of applications is TrueNAS being a NAS first is a great place to store data and the applications should be ephemeral meaning they can go away at any point of time we can rebuild them, we can delete them it doesn’t matter we don’t need to back up our applications we just point them at the config files and we can reload them on another NAS we only have to backup the data we care about which is going to be the configuration or any shared data within.
In order to make sure that your data is safe is to create a datastores to map them to your apps. The datasets structure can be as follows:
1
2
3
4
5
ZFS-Pool/
├── APP_Configs/
│   └── Nextcloud_Database/
└── APP_Data/
    └── Nextcloud/
After setting up needed datasets we can go to Applications ==> Discover and create an application that will be using these datasets.
Now, we can verify our app’s data into our newly created dataset.
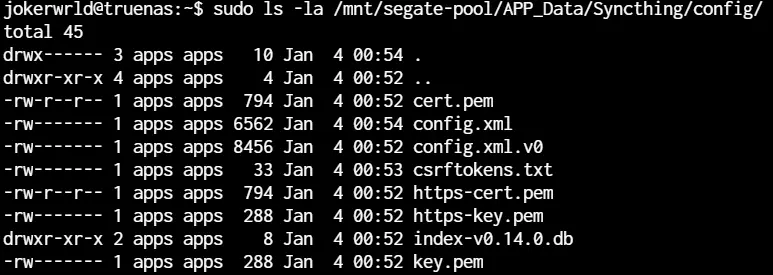
As far as our dataset is present our files are all intact and we can redeploy apps without loosing our data.
TRUECHARTS
We can expand our applications database by adding the TrueCharts Community App Catalog. TrueCharts is an open source project that contains pre-configured applications for TrueNAS Scale.
To add it we’ll just add a catalog in Applications/Discover/Catalogs tab:
1
https://github.com/truecharts/catalog